Recently, I have seen several requests from both customers and partners wanting to be able to run the VAAI UNMAP operation from within the vSphere Web Client. For those of you not familiar with the VAAI UNMAP operation, I recommend you check out this blog post by my colleague Cormac Hogan. Today, the only way to issue the UNMAP operation is by using ESXCLI either remotely or in the ESXi Shell. There is currently not a vSphere API for this operation and therefore it would be difficult to build a native vSphere Web Client Plugin to provide this functionality.
Having said that, one way to provide this capability is through the use of a vCenter Orchestrator (vCO) Workflow which can remotely execute an ESXCLI command whether that is going through ESXCLI using a Linux jump box or through PowerCLI using a Windows jump box. Starting with vSphere 5.5, you can now extend the vSphere Web Client and attach a vCO Workflow to a vSphere Object and be able to execute the workflow right from the vSphere Web Client. This is great if you are already using vCO, but for those that are not, it can be somewhat complex to setup along with a steep learning curve depending on your experience.
Today, there was an exciting announcement from my Automation buddy, Alan Renouf for a new VMware Fling called PowerActions for the vSphere Web Client. This new Fling allows you to easily extend the vSphere Web Client in the following ways:
- Access a PowerCLI console directly in the vSphere Web Client
- Ability to run a context aware PowerCLI script directly from the vSphere Web Client
The prerequisite for setting up PowerActions is no different than vCO calling a PowerCLI script, you just need a Windows "jump-box" that has PowerCLI installed along with PowerActions. The added benefit, is that you do need to setup another piece of infrastructure like vCO if you are not already using it. This made setting up PowerActions extremely easy to setup and even I was able get it up and running in under 5minutes (minus a quick RTFM moment :)).
Given the number of inquiries regarding VAAI UNMAP operation via the vSphere Web Client, I thought that would be a great use case for my first PowerActions script! Below are the instructions on creating the VAAI UNMAP script for PowerActions:
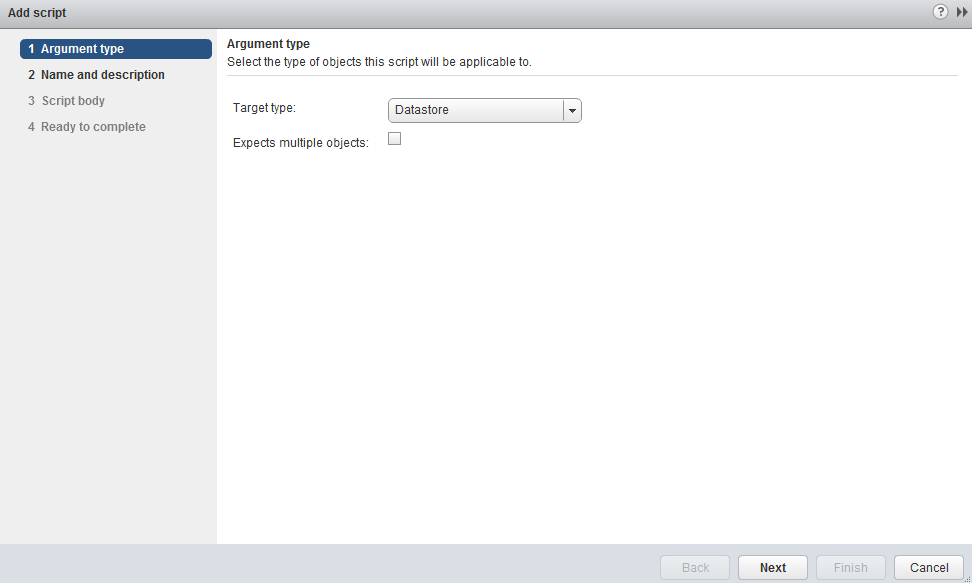
Step 1 - Click on the PowerCLI Scripts option on the left hand side of the Object Navigator and then click on the "New Script" Icon. Select Datastore as the context aware object for the script.
Step 2 - Provide a name and description for the script. Also make sure to select "Action".

Step 3 - Copy and paste the following script from https://github.com/lamw/vghetto-scripts/blob/master/powershell/unmap-poweraction.ps1 inside the script window and then save the script. What the script does is takes the Datastore object and retrieves a list of ESXi hosts that has access to the Datastore and then randomly selects one of the host. This is required because ESXCLI operations on a per host level and we use that information to pass into Get-EsxCli cmdlet to issue the VAAI UNMAP operation.
Step 4 - To test the script, you just need to right click on a VMFS Datastore and click on PowerCLI->Execute a Script

Note: Please be aware of the impact when running a UNMAP operation, you may want to run this on a non-production datastore for testing purposes or during off hours when your workload may not be as busy.
Step 5 - Select the VAAI UNMAP script you just created and once selected and you will be prompted to specify the number of VMFS blocks to unmap per iteration which is exactly the same input when manually ESXCLI.

At this point, if everything was successful the VAAI UNMAP operation should begin and you can tail /var/log/hostd.log to see the UNAMP operation. Once completed, you should see the prompt return true.
As you can see, it was extremely easy to create my own PowerAction script that expose new functionality and making it available within the vSphere Web Client. I think this is going to be a pretty popular Fling and remember if this is something you would like to see officially in the product, be sure to leave a comment on the PowerAction for vSphere Web Client Fling page, product managers are listening! The only feedback I have is that I would love to see this get extended beyond just PowerCLI and into a generic script extension framework, just imagine the possibilities!

