Over the weekend I received an interesting inquiry from a customer who had been playing with the ESXi-Arm Fling and wanted to know if it could run Victron Venus OS? I had never heard of Venus OS before, but a quick search online lead me to the company called Victron Energy which produces and sells various types of electrical chargers and they also have their own operating system to manage their software called Venus OS:
Venus OS is the software running on our Cerbo GX monitoring system, as well as its predecessors the Color Control GX, Venus GX and more. Also, it is in the GX versions of our MultiPlus-II and EasySolar-II inverter/chargers.
Venus OS can be installed on a Raspberry Pi (rPI) and the customer attempted to run it as a VM using ESXi-Arm on rPI using the techniques shared here and here but found that it was unable to boot with a message stating no kernel installed.
Given this was beyond my skillset, I pinged Cyprien, who works on ESXi-Arm at VMware to see if he had any ideas? In less than 30 minutes, he not only found out the reason the previous techniques could not be used but also came up with a quick workaround. Venus OS is a 32-bit OS and is not based on Debian and this is why you can not simply boot using the Debian Installer. The solution requires a custom Arm64 linux kernel that includes UEFI support to be built and installed to be able to boot Venus OS running as a VM on ESXi-Arm. For more information, please see the detailed instructions below and big thanks to Cyprien for his help over the weekend!
Step 1 - You need access to a system that has the qemu-img utility installed. In my setup, I am using a Photon OS 3.0 (x86) VM that I have lying around. This can also be an Ubuntu VM if you have one of those.
The following packages should be installed if you are using Photon OS:
tdnf -y install qemu-img unzip wget
Step 2 - Download the latest Venus OS WIC image to your system and uncompress it:
wget https://updates.victronenergy.com/feeds/venus/release/images/raspberrypi4/venus-image-raspberrypi4.wic.gz
gunzip venus-image-raspberrypi4.wic.gz
Step 3 - Use qemu-img to convert the image file to a VMDK
qemu-img convert -f raw venus-image-raspberrypi4.wic -O vmdk venus-image-raspberrypi4.vmdk
Step 4 - SCP the VMDK file to the datastore of your ESXi-Arm host
Step 5 - We need to actually convert the VMDK one more time so ESXi understands it, as the qemu-img utility only converts it to a hosted format which is normally used by Workstation/Fusion. To do so, we just use our good ol' friend, vmkfstools. You need to SSH (SSH is disabled by default) to the ESXi-Arm host after SCP'ing the VMDK and then run this command from ESXi-Arm host:
vmkfstools -i venus-image-raspberrypi4.vmdk -d thin venus-image.vmdk
After the conversion completes, you can delete the source VMDK.
Step 6 - Download the latest Debian 11 Arm Network Installer ISO and also upload that to the datastore of your ESXi-Arm host
Step 7 - Create a New VM called VenusOSS with the following configuration:
- Compatibility: ESXi 7.0 and later
- Guest OS Family: Linux
- Guest OS Version: Debian GNU/Linux 11 (64-Bit)
- CPU: 2 (or desired value)
- MEM: 2GB (or desired value)
- Hard Disk 1: Remove default since we are going to attach the one we just converted. To so by clicking on "Add New Device" and select Existing Hard Disk and locate that on the ESXi-Arm datastore
- CD/DVD dive 1: Select Datastore ISO File and locate the Debian Network Installer ISO from ESXi-Arm Datastore and ensure the device has checked box for "Connected"
Click OK to finish creating the new VM

Step 8 - Increase the VMDK size by editing the VM and specifying the desired disk capacity. In the example below, I am selecting 8GB.

Step 9 - Power on the VM and in then select Advanced options from the GRUB menu

Step 10 - Next, select Rescue Mode

Step 11 - Complete the basic setup screen (language, country, keyboard, hostname, domain and timezone) before we can boot into rescue mode.
Step 12 - Select /dev/sda2 to boot from

Step 13 - Select the Execute a shell in /dev/sda2 and you will be prompted once more, hit continue.

Step 14 - Run the following command to update the required scripts:
sed -e s/mmcblk0p/sda/ -i /etc/fstab
sed -e s/mmcblk0p/sda/ -i /etc/init.d/zzz-resize-sdcard
sed -e s/mmcblk0/sda/ -i /etc/init.d/zzz-resize-sdcard
sed -e s/AMA0/S0/g -i /etc/inittab

Step 15 - Mount the /u-boot directory and clean out the existing image before we can install our new kernel image:
mount /u-boot
cd /u-boot
rm -rf *

Step 16 - Setup a temp passwd and enable SSH, so we can SCP our new kernel image:
passwd
/etc/init.d/sshd start

Step 17 - Download the pre-built Arm64 kernel Image.gz (Thanks to Cyprien) or you can follow the instructions in the README and build from source yourself
Step 18 - Retrieve the current IP Address and then from your desktop, SCP the Image.gz file to /u-boot directory

Step 19 - Uncompress the Image.gz by running the following command:
gunzip Image.gz

Step 20 - Unmount the /u-boot directory, disconnect Debian ISO and reboot
cd /
umount /u-boot
exit


Note: There may still be a lock on ISO, so you may need to navigate to VM Summary page and answer the question to break the lock if the VM has not successfully rebooted
Step 21 - Reboot and go enter the EFI Manager to configure our boot image. The easiest way to do this is to click on the "Send Ctrl+Alt+Delete" button in the VM Console and then hit Esc when you see the VMware logo. Select Boot Manager

Step 22 - Next, select EFI Internal Shell

Step 23 - Lastly, enter the following into the console to boot our Venus OS image:
fs0:Image root=/dev/sda2

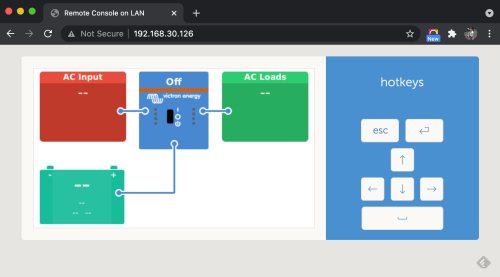
If everything was configured correctly, Venus OS should now successfully boot and you can retrieve the IP Address and open a browser to access its remote console as shown in the screenshot below

To always boot into the EFI Internal Shell, you can change the default boot order by going into Boot Maintenance Manager as shown below.

To automatically run the boot command instead of having to manually type it each time, we can edit the startup.nsh script. To do so, change to fs0: and then type
edit startup.nsh
and you will be taken to EFI editor where you can enter boot command in Step 23. To save the file, use Ctrl+S and confirm the file. Then exit using Ctrl+Q and now Venus OS will automatically boot without any user intervention.

Wicked - thanks so much. I have shared this awesome post and progress on the Victron Community Forum also for others to see how wonderful ESXI on ARM is. 🙂
Step 23 has a small typo in the Code text. It has an unnecessary space between the fs0: and Image
The screenshot shows the correct syntax which works.
Yup, I've just fixed it. Thanks
Step 5 has a typo you put "vmkfstools" it should be "vmfstools"
Its not a typo 🙂 The tool is located on ESXi Shell and it is called "vmkfstools"
What a great story. Cyprien (and you) are the bees knees.
Hi.
Great Work.
Can you provide an Image with your modifications?
I am Not so familiar with linux console and that stuff.
But I want to Run Venus OS in an virtual Environment.
Can you Share your Image as Download?
Thank you.
That would be great! Even if we could get it to work on VMWare workstation would be amazing as I've wasted all day trying to get this to work.
HALLO William,
There is a Target error at Step 13 (dev/sda2) in my target.
What can be the reason of that ?
Thanks a lot !
I made it to step 23. However when i enter fs0:Image root=/dev/sda2 i get the error: fs0Image is not recognized as an internal or external command. Any ideas?
Hello,
I was able to run the venus-os but i cannot access the remote console. There is no port-80 open... The rest is working (ssh, ...)
Any ideas?
Wanting to run this on pimox is there any chance of doing a tutorial for this?
Hello! thank you very much for your guide, a few years late :p , but I'm also stuck at step 13, when I press enter it just jumps back. don't get to any shell. What could be wrong? Any advice.? THANKS!
Hi just spent all night trying to do this. I done every step and it loads to a raspberry pi shell? But I can not get any IP to access it. Any ideas.
Keep up the Great work 😊