WilliamLam.com

  • About
    • About
    • Privacy
  • VMware Cloud Foundation
    • VMware Cloud Foundation 9.1
    • VMware Cloud Foundation 9.0
  • VKS
  • Homelab
    • Hardware Options
    • Hardware Reviews
    • Lab Deployment Scripts
    • Nested Virtualization
    • Homelab Podcasts
  • VMware Nostalgia
  • Apple

Automated NSX-T 2.0 Lab Deployment

10.24.2017 by William Lam // 21 Comments

Last week, I had spent some time exploring and getting myself more familiar with NSX-T, which is the next generation release of the NSX platform from VMware. One of the first thing I do when learning about a new product is to setup a lab environment that I can using. Having gone through the deployment once by hand, I realized it would be quite painful if I needed to do this again, which I know I will and I did 🙂 I wanted to have a simliar experience to my vGhetto Automated vSphere Lab deployment script which also including setting up the entire vSphere infrastructure along with deploying and configuring NSX-V and extending it to support NSX-T.

Since my original script leverages PowerCLI to access both the vSphere and NSX APIs, I wanted to do the same with NSX-T. Funny enough, the PowerCLI team had just published an update release (6.5.3) which also added support for NSX-T and I thought this was perfect timing to try out the NSX-T APIs, which I had never used before.

UPDATE (01/01/2018) - I have verified the script also works with the latest NSX-T 2.1 which was just released before Christmas. The script has also been updated to create a new Edge Uplink Profile along with an Edge Cluster and automatically associate all Edge VMs to Edge Cluster.

I have created a new Github repository called vghetto-nsxt-automated-lab-deployment which contains detailed instructions along with the PowerCLI script.

Here is what the script is currently performing:

  1. Deploy and configure vCenter Server Appliance 6.5u1
  2. Deploy and configure 3 x Nested ESXi 6.5u1 Virtual Appliance VMs and attaching it to vCenter Server
  3. Deploy NSX-T Manager, 3 x Controllers & 1 x Edge and setup both the Management and Control Cluster Plane
  4. Configure NSX-T with IP Pool, Transport Zone, Add vCenter Server as Compute Manager, Create Logical Switch, Prepare ESXi hosts, Create Uplink Profile & Add configure ESXi hosts as a Transport Node

Similiar to the vSphere version of this script, all deployed VMs will be placed inside of a vCenter vApp construct as shown in the example screenshot below:


Here is an example output of a succesful deployment and you go from nothing to a fully functional NSX-T environment in just 50 minutes, which is pretty awesome if you ask me!?

[Read more...]

Categories // Home Lab, NSX, PowerCLI Tags // ESXi 6.5, NSX-T, PowerCLI, vSphere 6.5 Update 1

Automating VM keystrokes using the vSphere API & PowerCLI

09.28.2017 by William Lam // 42 Comments

I am constantly amazed at the number of new use cases that can now be enabled with some of the new and updated capabilities of our vSphere Platform. I recently discovered a new vSphere API that was introduced in vSphere 6.5 called PutUsbScanCodes() which may sound a little strange but it enables some really slick Automation capabilities. This feature allows customers to send keyboard character keystrokes directly to a VM regardless of the underlying OS. In fact, the OS does not even have to be booted up for this to work which means there is no reliance on VMware Tools as this is happening at the Virtual Hardware layer.

You might ask, why would this be interesting? Lets take a look at a scenario that I had ran into years ago when I was a customer and why this feature would have really helped. At the time, there were several Virtual Appliance solutions that I needed to deploy, although I could automate the deployment, I could not automate the initial setup process. The reason for this is that before the OS is fully booted up, it required the user to interactively provide password on boot which can only be done using the VM Console. This meant solutions like the Guest Operations API was out of the question since VMware Tools is not running during this time. I suspect many of you have probably came across a similiar situation, where you are prompted for a password or some other manual input was required and the only solution is to be in front of the VM Console. Some other interesting use cases that this feature could help with are OS installations where automated deployments may not be possible due to the type of OS, automated filesystem check (fsck) or verification where manual intervention was the only option. The possibilities for this API is truly endless and I am sure there are many many more use cases where this feature could be used.

OK, so now that are you sold on the feature, lets take a look at how it works! I have built a PowerCLI script called VMKeystrokes.ps1 which demonstrates the use of this vSphere API.

The API takes in an array of scan code events or what is referred to as USB Human Interface Device (HID) Codes which is part of the USB specification for human interactions with a computer system. There was not any details on what exactly this even looked like, so it took me awhile to figure out the input and what the API was expecting. I found this online reference here which provided a mapping of keyboard keys to their respective scan codes which I have implemented a subset of the scan codes within my script. However, upon further inspection, these scan codes could not be used as-is and required a conversion to the appropriate HID format which can be seen in my code. There also a modifier type within the API that can be associated with a given scan code. One use for this is to send an upper-case character rather than a lower case.

Lets now go through a demonstration to see how the Set-VMKeystrokes function works. In my environment, I have a PhotonOS VM running and I want to automate the login via the console which means I want to pass in the username (root), hit return, pass in the password (VMware1!) and hit return.

[Read more...]

Categories // PowerCLI, vSphere Tags // HID, keyboard, keystroke, PowerCLI, PutUsbScanCodes, USB scan codes, vSphere API

Reporting vSAN Object distribution across vSAN Disk Groups using PowerCLI

09.26.2017 by William Lam // Leave a Comment

Several weeks back, I was cleaning up my scratch space, where I store all my random code snippets for various questions which I receive on a regular basis and I came across a nifty little script that I had put together for a particular customer request. I had completely forgotten about it and I thought it could come in handy for some folks who might be curious in how their current vSAN Objects are currently being distributed across all vSAN Disk Groups within a vSAN Cluster.

RVC already provides a nice command called vsan.check_limits which gives you a break down of the number of components across all disks within a vSAN Cluster as shown in the screenshot below.


However, in the case of this particular customer, they wanted the break down on a per Disk Group level rather than individual disks.

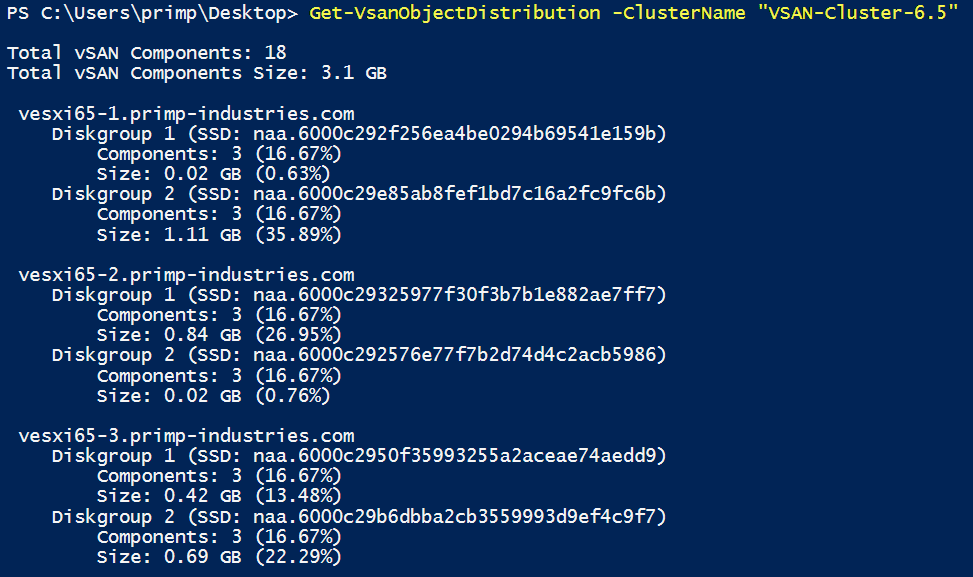
Luckily, all of this information is already exposed using the vSAN Management APIs, you simply just need to aggregate it one level up. With that, I created a PowerCLI script called VSANObjectDistribution.ps1 which allows you to provide the name of a vSAN Cluster and it will automatically provide you with both the number of components distributed across the different vSAN Disk Groups as well as the amount of storage consumed by these components.

Here is a screenshot for a 3-Node vSAN Cluster where each ESXi host contains two vSAN Disk Groups:


Since there is no actual number for a vSAN Disk Group, by default, I output the Canonical Disk Name of the "Cache" device for the given vSAN Disk Group so you can map it back.

If you prefer to see the vSAN UUID for the "Cache" device instead, you can simply set the -ShowvSANID parameter to true as shown in the screenshot below.


To correlate back the specific vSAN Disk Group, you simply select a particular vSAN Disk Group for the ESXi host you are interested in. At the bottom, add "vSAN UUID" column highlighted in orange and you can then compare either that ID or Canonical Disk Name highlighted in blue.

Categories // PowerCLI, VSAN Tags // components, PowerCLI, rvc, VSAN, vsan.check_limits

  • « Previous Page
  • 1
  • …
  • 19
  • 20
  • 21
  • 22
  • 23
  • …
  • 44
  • Next Page »

Search

Thank Author

Author

William is Distinguished Platform Engineering Architect in the VMware Cloud Foundation (VCF) Division at Broadcom. His primary focus is helping customers and partners build, run and operate a modern Private Cloud using the VMware Cloud Foundation (VCF) platform.

Connect

  • Bluesky
  • Email
  • GitHub
  • LinkedIn
  • Reddit
  • RSS
  • Twitter
  • Vimeo

Recent

  • VCF Agentic AI Hub (Code Assist) MCP Server Fling 10/05/2026
  • Automate Inventory of vSphere Supervisor Clusters & vSphere Kubernetes Service (VKS) Guest Clusters 10/02/2026
  • VCF 9.1.1 - OCuLink External Graphics (eGPU) Dock with integrated PSU for GPU Passthrough with VKS 10/01/2026
  • VCF 9.1.1 - Single ESX Host for VCF Fleet, VCF Workload Domain or VCF Cluster 09/30/2026
  • Bypassing Minimum Unique Flows & Metric Collection Period for vDefend Security Services Platform (SSP) 5.2 Lab Deployments 09/28/2026
Privacy & Cookies: This site uses cookies. By continuing to use this website, you agree to their use.

To find out more, including how to control cookies, see here: Cookie Policy

Copyright WilliamLam.com © 2026

Loading Comments...