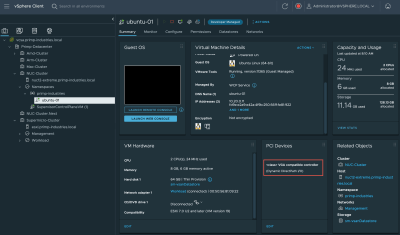
After successfully passing through the new Intel Arc 750/770 GPU to both a Linux and Windows VM running on ESXi, which also includes keyboard/mouse access and video output to an external monitor, I wanted to see if our vSphere with Tanzu solution could also take advantage of the new Intel Arc GPU?

The answer is absolutely YES! 😀
In vSphere 7.0 Update 3 MP01 and later, vSphere with Tanzu introduced the support for adding a Dynamic DirectPath I/O device to a VM that is provisioned using the VM Service Operator. Before we can take advantage of the new Dynamic DirectPath I/O feature, we first need to create a new custom VM Class definition that maps to our Intel Arc GPU.
Step 0 - Enable vSphere with Tanzu in your environment, I will assume the reader has already done this or knows how to. If not, please refer to the vSphere with Tanzu install documentation.
Step 1 - Navigate to your desired vSphere Namespace and create a new VM Class that includes the Dynamic DirectPath I/O feature and select the Intel Arc GPU from your ESXi host, which should already have passthrough enabled for the device. For more detailed instructions, please refer to the documentation here.

Step 2 - Create and install Ubuntu Server 22.04 VM (recommend using 60GB storage or more, as additional packages will need to be installed). Once the OS has been installed, go ahead and shutdown the VM.
Edit the VM and under VM Options->Advanced->Configuration Parameters and add the following:
pciPassthru.use64bitMMIO = "TRUE"
Optionally, if you wish to disable the default virtual graphics driver (svga), edit the VM and under VM Options->Advanced->Configuration Parameters change the following setting from true to false:
svga.present
Lastly, power on the VM and then follow these instructions for installing the Intel Graphic Drivers for Ubuntu 22.04 which will be needed to access the Intel Arc GPU.
Step 3 - Clone your Ubuntu VM to a local vSphere Content Library that is already associated with the vSphere Namespace. For more detailed instructions, please refer to the documentation here.
Step 4 - Create a YAML manifest that describes the VM deployment and specify the newly created VM Class which will then associate the Intel Arc GPU when the VM is deployed.
Here is an example of what the YAML manifest file can look like:
apiVersion: vmoperator.vmware.com/v1alpha1
kind: VirtualMachine
metadata:
  name: ubuntu-01
  labels:
    app: ubuntu-01
  annotations:
    vmoperator.vmware.com/image-supported-check: disable
spec:
  imageName: ubuntu-22.04
  className: intel-arc-gpu-medium
  powerState: poweredOn
  storageClass: vsan-default-storage-policy
  networkInterfaces:
  - networkType: vsphere-distributed
    networkName: workload-1
  vmMetadata:
    configMapName: ubuntu-01
    transport: CloudInit
---
apiVersion: v1
kind: ConfigMap
metadata:
    name: ubuntu-01
data:
  user-data: |
    #cloud-config
    write_files:
    - encoding: gz+b64
      content: H4sIAA6K1GIAA/NIzcnJV0grys9VCM/MyclMzPVJzNVLzs/lAgD/QoszGgAAAA==
      path: /tmp/vm-service-message.txt
    users:
    - name: vmware
      ssh-authorized-keys:
        ssh-rsa AAA....
Step 5 - Login to the Supervisor Cluster using the kubectl-vsphere plugin and then deploy your VM by using the following command:
kubectl apply -f gpu-vm.yaml
You can monitor the progress of the VM deployment and retrieve the IP Address that has been assigned by Supervisor Cluster IPAM system by using the following command
kubectl get vm -o wide

Once the VM is on the network, you can then login using whatever authentication mechanism that has been configured with the VM image whether that is username/password or using SSH keys. Once logged in, we can confirm that Intel Arc GPU is available by using the hwinfo command, if you have that installed, as shown in the screenshot below.

Unrelated to the vSphere with Tanzu and Intel Arc GPU testing, I have also been spending some time with Packer and the updated vsphere-iso builder. I was looking at converting one of my projects from the old vmware-iso provider to the more modern vsphere-iso builder, which leverages the vSphere API rather than communicating directly to ESXi over SSH.
The reason I am bringing this up is that I came to learn that we now have a new vSphere Supervisor Cluster builder that would enable Packer to create/deploy VMs using the VM Service Operator APIs that is part of the vSphere with Tanzu solution. So of course, I had to see if I can also deploy a VM with Intel Arc GPU via this method and again, the answer is yes!
Here is an example of the Packer HCL manifest that I had used:
packer {
    required_version = ">= 1.6.3"
    required_plugins {
        vsphere = {
            version = ">= v1.1.1"
            source  = "github.com/hashicorp/vsphere"
        }
    }
}

source "vsphere-supervisor" "ubuntu-intel-arc-gpu-vm" {
    image_name = "ubuntu-22.04"
    class_name = "intel-arc-gpu-medium"
    storage_class = "vsan-default-storage-policy"
    kubeconfig_path = "/Users/lamw/.kube/config"
    supervisor_namespace = "primp-industries"
    source_name = "ubuntu-01"
    network_type = "vsphere-distributed"
    network_name = "workload-1"
    keep_input_artifact = true
    ssh_username = "vmware"
    ssh_password = "VMware1!"
}

build {
    sources = ["source.vsphere-supervisor.ubuntu-intel-arc-gpu-vm"]

    provisioner "shell" {
        inline = [
            "touch /tmp/packer-vsphere-supervisor-build"
        ]
    }
}
To deploy using the Packer plugin, simply run the following command:
packer build gpu-vm.pkr.hcl
Note: You can also verify the HCL file by using the validate command prior to running build.
After a couple of minutes our VM is fully provisioned by the Packer plugin and we are ready to connect using the "Source" IP Address which is the one provided by the Supervisor Cluster IPAM as shown in the screenshot below.

Once logged into the VM, we can confirm the deployment was successful and it is attached to the Intel Arc GPU!

alright its good