WilliamLam.com

  • About
    • About
    • Privacy
  • VMware Cloud Foundation
  • VKS
  • Homelab
    • Resources
    • Nested Virtualization
  • VMware Nostalgia
  • Apple

ESXi Learnswitch – Enhancement to the ESXi MAC Learn DvFilter

04.24.2017 by William Lam // 23 Comments

The ESXi MAC Learn dvFilter Fling was released a little over two years ago and it has become a must have when it comes to running our ESXi Hypervisor within a VM, also referred to as Nested ESXi. The reason this Fling has become such a popular hit amongst our customers and partners is that it greatly improves the performance when “Promiscuous Mode” is enabled on a Virtual or Distributed Virtual Portgroup, which is a requirement for using Nested ESXi. Although this Fling works great, there are a couple of limitations with this solution today. The first of which is called out in the original Fling release notes, that once a MAC Address has been learned, it never ages out which is not ideal for long running Nested ESXi environments that generates a large amount of new MAC Addresses. The second, is the lack of vMotion support where the learned MAC Address table is not transfered to the destination ESXi host and must be re-learned.

To help address both of these limitations, the folks over in the Network and Security Business Unit (NSBU) have been working hard to improve upon the existing solution and have developed a new native MAC Learning VMkernel module called the Learnswitch. This new Learnswitch not only helps improves Nested ESXi workloads but it can also potentially benefit other workloads such as Nested Containers or other 3rd Party network inspection software. One immediate difference from the previous MAC Learn dvFilter solution is that rather than operating on the Network IO Chain, the filtering is now performed within the outer virtual switch layer itself which will provide some additional performance gains. The other added benefit from an internal VMware standpoint is that the Learnswitch is now vmkapi compatible, which means we will have a better backwards compatible story for supporting old releases of ESXi. One downside to this new solution compared to the previous one is that because the dvFilter operated below the virtual switch layer, it could support both a Virtual Standard Switch as well as the Distributed Virtual Switch. With the new Learnswitch, a Distributed Virtual Switch will be required. If you currently do not meet the requirements of the new Learnswitch, you can continue using the dvFilter, but it is recommended that you do not mix both on a single system but you can definitely make use of both solutions across different ESXi hosts depending on the constraints of your environment.

Here are some of the new capabilities provided by the new Learnswitch module:

  • Overlay Network based that learning and filtering are done in Etherswitch forwarding check
  • MAC Address learning is based on VLAN ID or VXLAN ID on uplink and leaf port
  • Packet is filtered on uplink and leaf port if the MAC is learned on a different port
  • MAC Address table size is 32k per system
  • MAC Address aging support with default aging time of 5 minutes and configurable
  • Unknown unicast packet is flooded by default and configurable to drop
  • vMotion support that the MAC table learned on the port is transferred to destination host and RARP packet is sent
  • Standalone VMkernel module available as a VIB
  • net-learnswitch CLI to display MAC Address table, configuration and stats

[Read more...]

Categories // ESXi, Nested Virtualization, NSX Tags // dvFilter, ESXi, Learnswitch, mac learning, Nested ESXi, nested virtualization, NSX, VXLAN

Does the ESXi Mac Learn dvFilter work with Nested ESXi on NSX VXLAN's?

09.19.2014 by William Lam // 3 Comments

After publishing my article on the new ESXi Mac Learn dvFilter which helps improve CPU/Network performance when using promiscuous mode with Nested ESXi, I received a couple of questions asking whether the dvFilter would work with NSX VXLAN's? At the time, I had only tested the Mac Learn dvFilter using standard VSS/VDS and not with any VXLAN based networks. I had reached out to a couple of folks asking whether this would work and to my surprise, I actually got back a mix set of answers to it will not work to it could work. One of the reasons that was given to me on why this may not work is that NSX-v (NSX for vSphere) leverages a different "virtual switch" than VSS/VDS and hence the Mac Learn dvFilter would not properly function. This actually would make sense, but because I received other responses negating that fact, I figured I probably should just test it for myself and see.

NSX 6.1 was recently released and I figured this would be a great opportunity for me to learn a bit more about NSX, as I have never played with it before and also test whether Mac Learn dvFilter would in fact work with NSX VXLAN's. In my lab environment I have deployed NSX and I have 3 physical ESXi hosts running VSAN (go SDS!). I deployed both an NSX ESR (Edge Service Router) hosting 2 Logical Networks (aka VXLAN segments) and an NSX DLR (Distributed Logical Router) hosting another 2 Logical Networks.

Here is a screenshot of the 4 Logical Networks, the first two on NSX ESR and the last two on NSX DLR:

nesetd-esxi-promiscous-mode-nsx-vxlan-0
Here is a screenshot of both the NSX ESR and DLR:

nesetd-esxi-promiscous-mode-nsx-vxlan-1
Note: If you would like to learn more about NSX ESR and DLR, check out this great article by Brad Hedlund who goes into more detail.

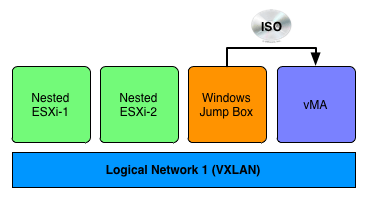
For my test, I first enabled Promiscuous Mode and Forged Transmit on the respective Logical Switches which is just a dvPortgroup on the VDS for my NSX ESR setup. I then had 2 Nested ESXi VMs running (without the Mac Learn dvFilter), a Windows "Jump Box" VM and vMA all connected to the same VLXAN network.
nesetd-esxi-promiscous-mode-nsx-vxlan-3
I then transfer an ISO from the Windows VM to vMA while running ESXTOP on the physical ESXi host which is hosting these four VMs. As I expected, both the Nested ESXi VMs and vMA were receiving network packets. Next, I installed the Mac Learn dvFilter VIB on the physical ESXi host and added the required VM Advanced Settings to both the Nested ESXi VMs and then re-ran the test. To my surprise, both the Nested ESXi VMs were no longer receiving the erroneous packets! So it seems that using VLXAN with NSX ESR, the Mac Learn dvFilter is working as expected.

To be thorough, I also ran through same test but now for the VXLAN segments backed by NSX DLR. This time, I was really surprised by the results. The test was prior to installing the Mac Learn dvFilter and my expectation was that the two Nested ESXi VMs would be seeing the duplicated network packets from the VDS, but to my surprise, they did not! Both the Nested ESXi VMs were pretty much idling at 0 packets as nothing was being sent to them. I am not exactly sure why I was seeing this behavior, perhaps there is some type of optimization in the DLR? This is something I hope to get an answer from someone in Engineering on why I might be seeing this positive behavior.

To summarize, this myth has been busted and the Mac Learn dvFilter does in fact work with VXLAN networks. If you are using NSX ESR for your VXLAN setup, then you will need to install the dvFilter and if you are using NSX DLR, it seems like you do not need to make any additional changes. After briefly speaking with Christian Dickmann, the creator of the dvFilter as I wanted to share the results with him, I also learned about some interesting tidbits. Christian was not surprised by the results actually, the reason for this is that the VMkernel networking stack was architected and designed to be modular. This meant that, one could switch out the "virtual switch" with other implementations and the underlying dvFilter framework would still continue to work regardless of the "virtual switch" being used.

Additional Note:

  • I did not get a chance to test with vCNS and VXLAN, but I believe it should work given NSX-v is functional. If you are able to test this, feel free to leave a comment on whether the expected behavior is seen with the Mac Learn dvFilter.
  • I did not get a chance to test this with vCloud Director with VXLAN based networks, but as I mentioned, this should work. Please leave a comment if you can confirm
  • I also noticed when creating the Logical Switches, there is a Mac Learning capability, but from my testing, I found it did not benefited Nested ESXi and the Mac Learn dvFilter was still required.

Categories // ESXi, Nested Virtualization, NSX Tags // dvFilter, ESXi, mac learning, NSX, VXLAN

How To Enable Nested ESXi Using VXLAN In vSphere & vCloud Director

05.06.2013 by William Lam // 9 Comments

Recently I had received several inquiries asking on how to configure nested ESXi (Nested Virtualization) to function in a VXLAN environment. I have written several articles in the past on configuring nested ESXi in a regular vSphere and vCloud Director environment, but with the use of a VXLAN backed network, there are a few additional steps that are required. These steps include additional configurations of the vCloud Network & Security Manager (previously known as vShield Manager) which ensures that both the required promiscuous mode and forged transmits are automatically enabled for the VXLAN virtual wires (vWires) as they are managed exclusive by the vCNS Manager.

In this article, I will walk you through the configurations that is required when using VXLAN in both a vSphere only environment as well as a vCloud Director environment. If you would like to learn more about how VXLAN works, be sure to check out the multi-part VXLAN series (Part 1/Part 2) by Venky Deshpande.

Disclaimer: This is not officially supported by VMware, please use at your own risk.

Configurations for VXLAN in vSphere Environment

Step 1 - Deploy vCNS Manager and configure it to point to your vCenter Server (do not enable or prepare VXLAN, this must be done after the configurations)

Step 2 - You will need to identify the VDS MoRef ID in your vCenter Server which will be used in the next step. Since the configuration is applied at the VDS level, you may want to consider having a separate VDS serving Nested Virtualization traffic since both promiscuous mode & forged transmits will automatically be enabled for all vWires. To locate the VDS MoRef ID, login to the vSphere Web Client and select the summary view for the VDS.

The VDS MoRef ID will be towards the end of the URL link and it should start with dvs-X where X is some arbitrary number. Record this value down for the next step

Step 3 - Download the enablePromForVDS.sh shell script which will be used to prepare the VDS within the vCNS Manager. The script basically performs a POST to the REST API to the vCNS Manager using cURL and it accepts three input parameters: vCNS Manager IP Address/Hostname, VDS MoRef ID and VDS MTU. The username/password is hard coded in the script to use the default which is admin/default. If you have modified the default password like any good admin, you will want to change the password before running the script. If you take a look at the request body, you will notice only promiscuous mode is enabled to true, but this will also automatically enable forged transmits as well.

In my lab enviroment, I have the vCNS Manager IP to be 172.30.0.196, VDS MoRef ID to be dvs-13 and VDS MTU to be 9000. So the syntax to run the script would be:

./enablePromForVDS.sh 172.30.0.196 dvs-13 9000

Here is a screenshot of executing the script, you should see a response back with 200 to indicate successful execution of the script.

Step 4 - Now, we will proceed with the VXLAN preparation. Start off by logging into the vCNS Manager and selecting the vSphere Datacenter which you wish to enable VXLAN. On the right you should see a tab called "Network Virtualization" go ahead and click on that and then click on the sub-tab called "Preparation". Click on edit and then select the vSphere Cluster and proceed through the wizard based on your environment configuration.

Step 5 - Once the VXLAN preparation has completed, click on the "Segment ID" and configure that based on your environment.

Step 6 - Next, click on "Network Scopes" and you will create a network scope and specify the set of vSphere Clusters the VXLAN network will span.

Step 7 - Lastly, click on "Networks" and this is where you will create your vWires and ensure it the proper network scope is selected.

Step 8 - To confirm that everything has been configured properly. We now log back into our vSphere Web Client and heading over to the VDS settings page. You should now see a new vWire portgroup that is created, if we take a look at it's settings we should see that both promiscuous mode and forged transmits is enabled.

You are now done with the VXLAN configurations in the vCNS Manager and can proceed to the regular instructions for enabling Nested ESXi for vSphere.

Note: If you have already prepared VXLAN in your environment, you can still configure the above without having to un-prepare your VXLAN configurations. You just need to login to the vCNS Manager via the REST API and perform a DELETE on the VDS switch (Please refer to page 153 of the vCNS API Programming Guide) which will just delete the mapping from vCNS but will not destroy any of your VDS configuration. Once that is done, you will be able to use the script to configure the VDS with the proper settings.

Configurations for VXLAN in vCloud Director Environment

A VXLAN network pool is automatically created for you when using vCloud Director 5.1, so the steps for preparing Nested Virtualization for vCloud Director is extremely simple compared to the vSphere only environment.

Note: VXLAN is only supported in vCloud Director 5.1, for previous versions you have the choice of using a VCD-NI or vSphere backed network and the configurations for that can be found here.

Step 1 - Please follow the steps 1-5 from above in the vSphere only environment and then you are done. If you would like a more detailed walk through for configuring VXLAN for a vCloud Director environment, check out this article by Rawlinson Rivera who takes you through the process step by step.

Step 2 - Proceed to the regular instructions for enabling Nested ESXi for vCloud Director.

Step 3 - Lastly, you will go through the vCloud Director setup which is to attach your vCenter Server & vCNS Manager, create a Provider VDC, create an Organization and assign resources to your Organization VDC and ensure that the OrgVDC is consuming the VXLAN network pool that is automatically created for you when you create the Provider VDC. Once that is done, when you deploy your vApp, you will see a vWire that automatically created for you. If we login to the vSphere Web Client and go to the VDS settings, you will see the vWire has both promiscuous mode and forged transmits automatically enabled.

Additional Resources:

  • Nested Virtualization Resources

Categories // Automation, Nested Virtualization, NSX Tags // nested, vcloud director 5.1, vcloud networking and security, vcns, vhv, vSphere 5.1, VXLAN

Search

Thank Author

Author

William is Distinguished Platform Engineering Architect in the VMware Cloud Foundation (VCF) Division at Broadcom. His primary focus is helping customers and partners build, run and operate a modern Private Cloud using the VMware Cloud Foundation (VCF) platform.

Connect

  • Bluesky
  • Email
  • GitHub
  • LinkedIn
  • Mastodon
  • Reddit
  • RSS
  • Twitter
  • Vimeo

Recent

  • VMware Flings is now available in Free Downloads of Broadcom Support Portal (BSP) 05/19/2025
  • VMUG Connect 2025 - Minimal VMware Cloud Foundation (VCF) 5.x in a Box  05/15/2025
  • Programmatically accessing the Broadcom Compatibility Guide (BCG) 05/06/2025
  • Quick Tip - Validating Broadcom Download Token  05/01/2025
  • Supported chipsets for the USB Network Native Driver for ESXi Fling 04/23/2025

Advertisment

Privacy & Cookies: This site uses cookies. By continuing to use this website, you agree to their use.
To find out more, including how to control cookies, see here: Cookie Policy

Copyright WilliamLam.com © 2025


Loading Comments...