Earlier this month I wrote an article demonstrating a functional USB ethernet adapter for ESXi 5.1. This was made possible by using a custom built driver for ESXi that was created over three years ago by a user named Trickstarter. After having re-discovered the thread several years later, I had tried reaching out to the user but concluded that he/she has probably moved on given the lack of forum activity in the recent years. Over the last few weeks I have been investigating to see if it was possible to compile a new version of the driver that would function with newer versions of ESXi such as our 5.5 and 6.0 release.
UPDATE (02/12/19) - A new VMware Native Driver for USB-based NICs has just been released for ESXi 6.5/6.7, please use this driver going forward. If you are still on ESXi 5.5/6.0, you can continue using the existing driver but please note there will be no additional development in the existing vmklinux-based driver.
UPDATE (01/22/17) - For details on using a USB-C / Thunderbolt 3 Ethernet Adapter, please see this post here.
UPDATE (11/17/16) - New driver has been updated for ESXi 6.5, please find the details here.
After reaching out to a few folks internally, I was introduced to Songtao Zheng, a VMware Engineer who works on some of our USB code base. Songtao was kind enough to provide some of assistance in his spare time to help with this non-sanction effort that I was embarking on. Today, I am please to announce that we now have a functional USB ethernet adapter driver based on the ASIX AX88179 that works for both ESXi 5.5 and 6.0. This effort could not have been possible without Songtao and I just want to say thank you very much for all of your help and contributions. I think it is safe to say that the overall VMware community also thanks you for your efforts. This new capability will definitely enable new use cases for vSphere home labs that were never possible before when using platforms such as the Intel NUC or Apple Mac Mini for example. Thank you Songtao! I would also like to extend an additional thank you to Jose Gomes, one of my readers, who has also been extremely helpful with his feedback as well as assistance on testing the new drivers.
Now, Before jumping into the goods, I do want to mention there are a few caveats to be aware of and that I think it is important to understand them before making any purchasing decisions.
- First and foremost, this is NOT officially supported by VMware, use at your own risk.
- Secondly, we have observed there is a substantial difference in transfer speeds between Transmit (Egress) and Receive (Ingress) traffic which may or may not be acceptable depending on your workload. On Receive, the USB network adapter is performing close to a native gigabit interface. However, on Transmit, the bandwidth mysteriously drops by ~50% which includes very inconsistent transfer speeds. We are not exactly sure why this is the case, but given ESXi does not officially support USB based ethernet adapters, it is possible that the underlying infrastructure was never optimized for such devices. YMMV
- Lastly, for the USB ethernet adapter to properly function, you will need a system that supports USB 3.0 which kind of makes sense for this type of a solution to be beneficial in the home lab. If you have a system with USB 2.0, the device will probably not work at least from testing that we have done.
Note: For those interested in the required source code changes to build the AX88179 driver, I have published all of the details on my Github repo here.
Disclaimer: In case you some how missed it, this is not officially supported by VMware. Use at your own risk.
Without further ado, here are the USB 3.0 gigabit ethernet adapters that are supported with the two drivers:
- StarTech USB 3.0 to Gigabit Ethernet NIC Adapter
- StarTech USB 3.0 to Dual Port Gigabit Ethernet Adapter NIC with USB Port
- j5create USB 3.0 to Gigabit Ethernet NIC Adapter (verified by reader Sean Hatfield 03/29/16)
- Vantec CB-U300GNA USB 3.0 Ethernet Adapter (verified by VMware employee 05/19/16)
- DUB-1312 USB 3.0 Gigabit Ethernet Adapter (verified by twitter user George Markou 07/29/16)
Note: There may be other USB ethernet adapters that uses the same chipset which could also leverage this driver but these are the only two that have been verified.

Here are the ESXi driver VIB downloads:
- ESXi 5.5 Update 3 USB Ethernet Adapter Driver VIB or ESXi 5.5 Update 3 USB Ethernet Adapter Driver Offline Bundle
- ESXi 6.0 Update 2 USB Ethernet Adapter Driver VIB or ESXi 6.0 Update 2 USB Ethernet Adapter Driver Offline Bundle
- ESXi 6.5 USB Ethernet Adapter Driver VIB or ESXi 6.5 USB Ethernet Adapter Driver Offline Bundle
Note: Although the drivers were compiled against a specific version of ESXi, they should also work on the same major version of ESXi, but I have not done that level of testing and YMMV.
Verify USB 3.0 Support
As mentioned earlier, you will need a system that is USB 3.0 capable to be able to use the USB ethernet adapter. If you are unsure, you can plug in a USB 3.0 device and run the following command to check:
lsusb

What you will be looking for is an entry stating "Linux Foundation 3.0 root hub" which shows that ESXi was able to detect a USB 3.0 port on your system. Secondly, look for the USB device you just plugged in and ensure the "Bus" ID matches that of the USB 3.0 bus. This will tell you if your device is being claimed as a USB 3.0 device. If not, you may need to update your BIOS as some systems may have USB 2.0 enabled by default like earlier versions of Intel NUC as desribed here. You may also be running pre-ESXi 5.5 which did not support USB 3.0 as mentioned here, so you may need to upgrade your ESXi host to at least 5.5 or greater.
Install Driver
You can either install the VIB directly onto your ESXi host or by creating a custom ESXi ISO that includes the driver using a popular tool like ESXi Customizer by Andreas Peetz.
To install the VIB, upload the VIB to your ESXi host and then run the following ESXCLI command specifying the full path to the VIB:
esxcli software vib install -v /vghetto-ax88179-esxi60u2.vib -f

Lastly, you will need to disable the USB native driver to be able to use this driver. To do so, run the following command:
esxcli system module set -m=vmkusb -e=FALSE
You will need to reboot for the change to go into effect.
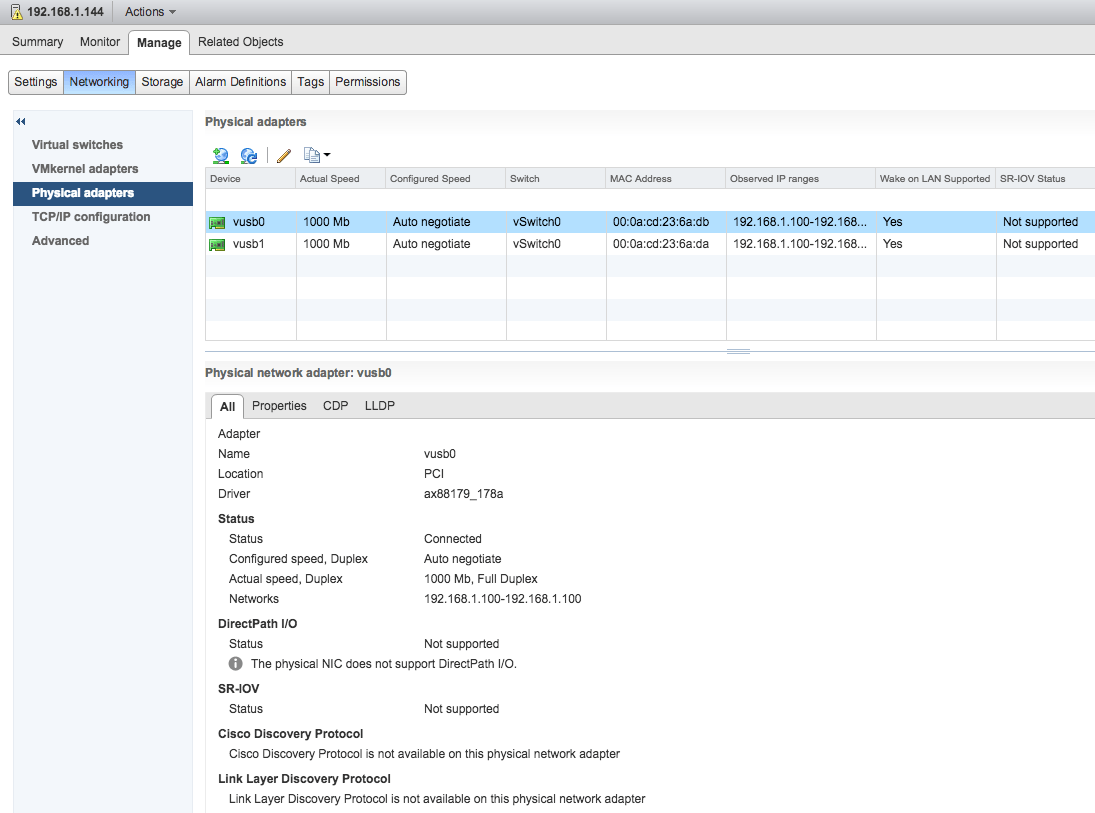
To verify that the USB network adapter has been successfully claimed, run either of the following commands to list your physical NICs:
esxcli network nic list
esxcfg-nics -l

To add the USB uplink, you will need to either use the vSphere Web Client or ESXCLI to add the uplink to either a Virtual or Distributed Virtual Switch.

To do so using ESXCLI, run the following command and specify the name of your vSwitch:
esxcli network vswitch standard uplink add -u vusb0 -v vSwitch0
Uninstall Driver
To uninstall the VIB, first make sure to completely unplug the USB network adapter from the ESXi first. Next, run the following ESXCLI command which will automatically unload the driver and remove the VIB from your ESXi host:
esxcli software vib remove -n vghetto-ax88179-esxi60u2
Note: If you try to remove the VIB while the USB network adapter is still plugged in, you may hang the system or cause a PSOD. Simply reboot the system if you accidentally get into this situation.
Troubleshooting
If you are not receiving link on the USB ethernet adapter, it is most likely that your system does not support USB 3.0. If you find the a similar message like the one below in /var/log/vmkernel.log then you are probably running USB 1.0 or 2.0.
2016-03-21T23:30:49.195Z cpu6:33307)WARNING: LinDMA: Linux_DMACheckConstraints:138: Cannot map machine address = 0x10f5b6b44, length = 2 for device 0000:00:1d.7; reason = address exceeds dma_mask (0xffffffff))
Persisting USB NIC Configurations after reboot
ESXi does not natively support USB NIC and upon a reboot, the USB NICs are not picked up until much later in the boot process which prevents them from being associated with VSS/VDS and their respective portgroups. To ensure things are connected properly after a reboot, you will need to add something like the following in /etc/rc.local.d/local.sh which re-links the USB NIC along with the individual portgroups as shown in the example below.
esxcfg-vswitch -L vusb0 vSwitch0
esxcfg-vswitch -M vusb0 -p "Management Network" vSwitch0
esxcfg-vswitch -M vusb0 -p "VM Network" vSwitch0
You will also need to run /sbin/auto-backup.sh to ensure the configuration changes are saved and then you can issue a reboot to verify that everything is working as expected.
Summary
For platforms that have limited built-in networking capabilities such as the Intel NUC and Apple Mac Mini, customers now have the ability to add additional network interfaces to these systems. This will now open up a whole new class of use cases for vSphere based home labs that were never possible before, especially with solutions such as VSAN and NSX. I look forward to seeing what our customers can now do with these new networking capabilities.
Additional Info
Here are some additional screenshots testing the dual USB 3.0 ethernet adapter as well as a basic iPerf benchmark for the single USB ethernet adapter. I was not really impressed with the speeds for the dual ethernet adapter which I had shared some more info here. Unless you are limited on number of USB 3.0 ports, I would probably recommend just sticking with the single port ethernet adapter.

iPerf benchmark for Ingress traffic (single port USB ethernet adapter):

iPerf benchmark for Egress traffic (single port USB ethernet adapter):


