As part of the VMware Cloud Foundation (VCF) 9.1.1 release, consuming NSX Virtual Private Cloud (VPC) has gotten simpler, especially for environments using traditional VLAN-backed networks. In VCF 9.1.0, users already had the ability to configure a VPC using a Distributed Transit Gateway (DTGW) and Distributed VLAN through the NSX Virtual Network Appliance (VNA), but this still required configuring NSX Tunnel Endpoints (TEPs) on each ESX host.
With VCF 9.1.1, the networking workflow has been further simplified with a new VLAN-backed VPC option. While it still uses DTGW and VNA, TEPs are no longer required, removing additional network requirements such as a larger MTU. As a result, environments that previously could not meet the networking requirements to configure a VPC can now deploy and consume services such as vSphere Kubernetes Service (VKS) and VCF Automation (VCFA).
It is also important to understand the different VPC consumption options and their constraints. The following table summarizes the capabilities and limitations of each option.
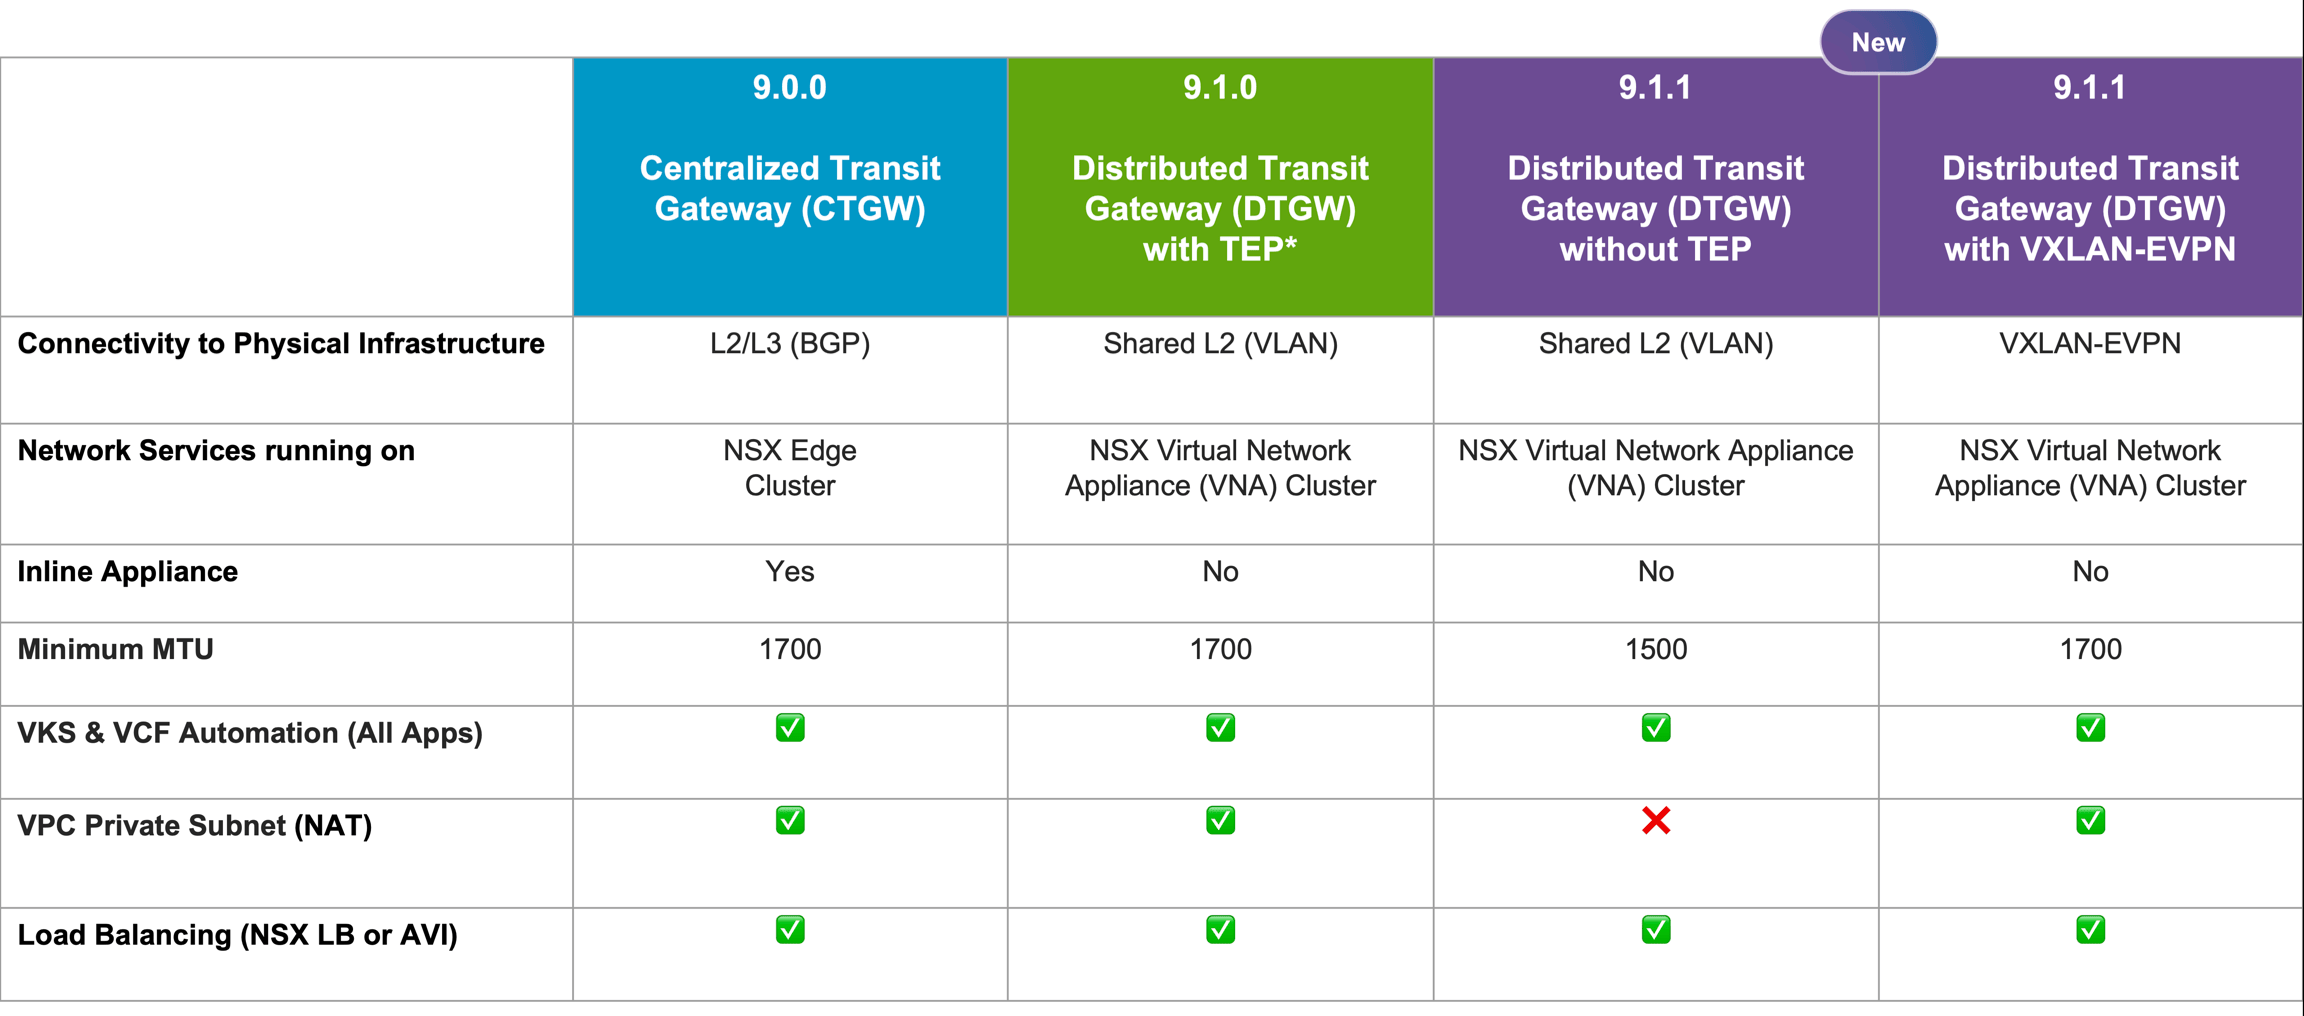
Note: DTGW with TEP was possible with VCF 9.0.0 but there was no support for VCFA until VCF 9.1.0.
Step 1 - Deploy a VCF 9.1.1 Fleet and select the new VLAN-backed VPC configuration option.

If you are using the JSON-based deployment workflow, replace the existing dtgwSpec configuration with the following and the remainder VPC configuration will be completed as post-deployment step.
"overlayVtepSpec": {
   "vtepType": "NO_IP"
}
Step 2 - After successfully deploying your VCF 9.1.1 Fleet, log in to vCenter Server and navigate to Network > Networks > Transit Gateways. Click Setup Networking to begin the configuration workflow.

Step 3 - Enter the VLAN ID and gateway CIDR that will be used for the External IP Block that you will define next. Click the three-dot menu to create a new External IP Block, ensuring that it contains the entire usable IP address range for the network.

For example, I am using VLAN 60 with a /24 network (172.30.60.0/24). The initial External IP Block must be defined using the entire /24 network and cannot be created using a smaller subnet carved from that address space.
If you attempt to create an IP Block that does not match the defined network, you will get the following error:
Error: Transit Gateway 'Default Transit Gateway' state is VLAN_BACKED_VPC. External IP block is only supported with matching distributed VLAN gateway network. [172.30.60.0/26] external ip block network is not have matching Distributed VLAN Gateway. (Error code: 640022) (Error code: 500157)
Step 4 - Next, we will define the configuration for the VNA Cluster and a minimum of one node is required.

After completing the VNA node configuration, click apply to return to main wizard.

Click finish to begin the deployment.

The VNA deployment may take several minutes to complete. You can monitor its progress and view the deployment status by selecting the vCenter Server inventory object and navigating to Configure > Networking > VNA Clusters. Once the deployment is complete, all status indicators should be green, confirming that the VNA cluster has been successfully deployed.

Step 5 - With the networking configuration complete, we are now ready to enable vSphere Supervisor. Click the hamburger menu in the upper-left corner of the vSphere Client, select Supervisor Management, and then click Get Started to begin.
Note: Ensure your vSphere Cluster has vSphere HA enabled before proceeding with vSphere Supervisor enablement as that is a requirement.
- Networking stack: VCF Networking with VPC
- Supervisor Name: Name your vSphere Supervisor (e.g. sv-01)
- Compatible Cluster: Select your vSphere Cluster
- vSphere Zone name: Name of vSphere Zone (e.g. vz-01)
- Storage: Select your desired Storage Policy
- Management Network: You will need a minimum of 5 IP Addresses for the vSphere Supervisor Control Plane VM (single node is supported)
- Workload Network: You can edit the DNS/NTP Server if those are different from your Management Network and you can leave the rest as defaults, which you can see is consuming from the VLAN backed VPC that we had configured earlier in Step 4
- Advanced Settings: You can start with Medium size deployment and provide an FQDN for the vSphere Supervisor API Endpoint
You can also export the configuration before proceeding to deployment, which can speed up future re-deployments is needed.

Note: Be sure to resolve or silence all vSAN Health Check warnings before enabling vSphere Supervisor, as any active warnings will prevent the deployment from completing successfully.
The deployment can take up to 5 to 10 minutes and ensure everything is green as shown in the screenshot below before proceeding creating your first VKS Cluster!

Step 6 - Click on the Namespace tab to create a new vSphere Namespace and assign the desired VM Classes, Storage Policy and VKR Content Library and then click on Resources tab, which is where you will be able to use vSphere UI to deploy various vSphere Supervisor Services including VKS.

When using a VLAN-backed VPC, deploying a VKS cluster with the Default Configuration option will result in the following error:
admission webhook "capi.validating.tanzukubernetescluster.run.tanzu.vmware.com" denied the request: cluster can not be deployed with default network(private) in a VPC namespace without SNAT
As of VKS 3.7 and earlier, the VKS Service defaults to using a Private VPC Subnet, which is not available when using a VLAN-backed VPC where all traffic is routed through the External IP Block. We need to update the vSphere Namespace to include a Public VPC Subnet and then deploy the VKS cluster using the Custom Configuration option to explicitly select the Public VPC Subnet.
In a future VKS Service release, both Private and Public VPC Subnets will be supported, with the appropriate option automatically selected based on the capabilities of the underlying VPC.
Step 7 - To create the required Public VPC Subnet, in your vSphere Name space, navigate to the Resources tab, go to the Network Service and select SubnetSets

Create a new VPC subnet with a descriptive name (e.g public), select Public as the access mode, and specify the number of IP addresses to allocate from the subnet.

We are now ready to create our VKS Cluster!
Step 8 - Navigate back to the K8s Service and select the Custom Configuration type which will give you a more expansive menu.

We only need to override the Network section for Node Network and use Use custom primary network option and select the Public VPC Subnet that we had created from previous step.

You can choose to change other settings or if you want the Default Configuration type behavior, simply skip the remainder screens and click finish to deploy your VKS Cluster. The deployment can take a few minutes but you should see VKS nodes getting cloned from your VKR Content Library and the IP Addresses used for these nodes will be coming from our External IP Block (e.g. 172.30.60.0/24) network that had defined earlier.

In a future VKS release, VLAN-backed VPCs will be supported out of the box and the additional configuration override will no longer be required. VCF Private AI Services (PAIS) also uses VKS on the backend, but because users do not have direct control over the underlying VKS deployment, PAIS can not currently be used with a VLAN-backed VPC. This will also be addressed with a future VKS release.
Great timing on this, William. I’ve been chasing an issue for the past few days trying to get VKS working in my CPU-constrained, single-node nested VCF 9.1.1 lab. I’m using the TEP-backed DTGW and VNA design, and on the surface everything looks healthy, including `vtep-0`. However, NSXA repeatedly logged “VtepMsg missing mac address” followed by “failed to parse vtep config,” and the Supervisor and VKS IPs remain unreachable. I’ve been trying to keep the lab as lightweight as possible, so the VNA has been a great alternative to deploying a full NSX Edge and Tier-0. I’m going to redeploy with this TEP-less design and see if removing the Geneve and VTEP layer finally does the trick. Thanks for laying this out!