WilliamLam.com

  • About
    • About
    • Privacy
  • VMware Cloud Foundation
  • VKS
  • Homelab
    • Hardware Options
    • Hardware Reviews
    • Lab Deployment Scripts
    • Nested Virtualization
    • Homelab Podcasts
  • VMware Nostalgia
  • Apple

VMware PowerCLI for Mac OS X, Linux & More? Yes, please!

09.06.2016 by William Lam // 10 Comments

powercli_for_mac_osx_linux_1There were a several announcements at last weeks VMworld US Conference, but one of the most exciting piece of news in my opinion was from Alan Renouf, Product Manager for all things API/SDK/CLI at VMware. During Alan's What's New PowerCLI session, he announced that PowerCLI is finally coming to both Mac OS X as well as Linux! As you can imagine, the news was very well received from customers and partners. In fact, after I had tweeted the update here & here, I literally had folks pinging/IM'ing/DM'ing me non-stop about when they could get access 🙂

UPDATE (10/18/16) - PowerCLI Multi-Platform (MP) for Linux and Mac OS X has now been released as a VMware Fling. Please find the download here and provide any feedback in the comments section.

This exciting update was only possible with the help of our friends over at Microsoft who had recently open sourced both .NET Core & PowerShell. Once that news broke, Alan and the PowerCLI Engineering team have been working hard on porting over the existing PowerCLI code which uses the Windows .NET library over to the new .NET Core which is now open sourced. I have been very impressed at how fast the PowerCLI team have already made available many of the default cmdlets as well as the Get View cmdlet which exposes the entire functionality of the vSphere API.

Now, before you get too excited, this new version of PowerCLI is currently not available yet. As Alan mentioned in his session, we plan to release an early Tech Preview of PowerCLI for both Mac OS X and Linux as a VMware Fling shortly after VMworld. It is also very important to note that Microsoft PowerShell for Mac OS X & Linux which PowerCLI uses is just at an Alpha release milestone. There is still much work to do on both sides but I am really looking forward to enabling our customers with the choice of platform when it comes to consuming PowerCLI.

powercli_for_mac_osx_linux_2
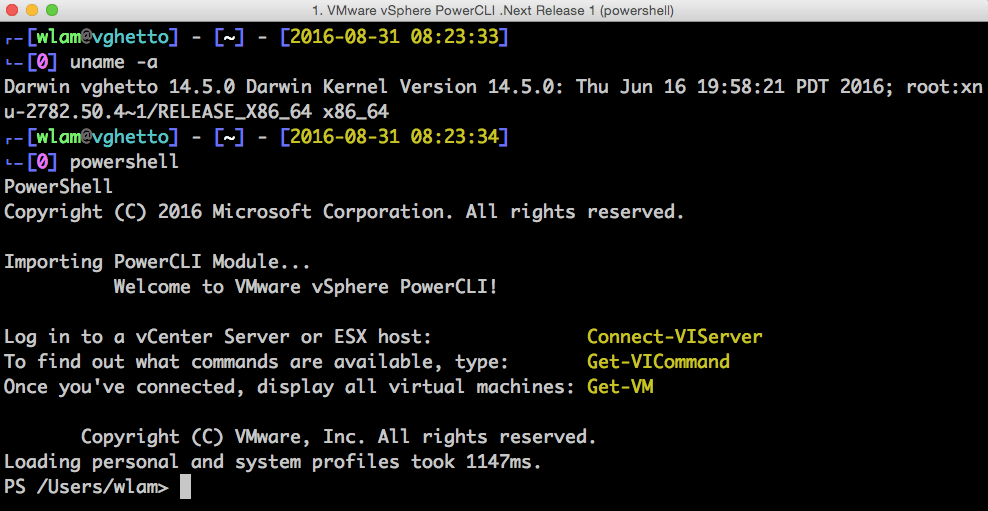
A few of us have been quite fortunate to have been involved in the early development of this new version of PowerCLI. In fact, we even built a simple Docker Container for PowerCLI which will allow you to easily access PowerCLI from any system that can run Docker. Here is a quick screenshot of spinning up a PowerCLI Docker Container which will also be part of the Fling release.

powercli_for_mac_osx_linux_3
Lastly, we want customers to be able to quickly and securely set up a persistent PowerCLI environment in which they can use to manage and configure their VMware-based products that support PowerCLI. With that, we have also built a PowerShell package for Photon OS which is VMware's minimal Linux container host distribution. Not only is it free to download and use, but it literally takes a few seconds to install (tdnf -y install powershell) and even less time to boot up and import the PowerCLI module. This was literally done the week before VMworld by the Photon team and huge kudos for their support! As you can see, not only do we want to provide choice for our customers but also simplifying how you might consume PowerCLI whether its natively on Windows, Mac OS X, Linux, Docker Container or running on top of VMware Photon OS. I hope you are excited as I am and stay tuned for more details on the Fling release!

If you have any feedback or what you are most excited regarding this news, please leave a comment and I will make sure it makes it way back to our Product Manager.

Categories // Apple, Automation, Docker, PowerCLI Tags // Docker, linux, Microsoft, osx, Photon, PowerCLI, PowerCLICore, powershell, vSphere

Apple Mac Pro 6,1 PCIe SSD issue resolved w/ESXi 6.0 Update 2

03.15.2016 by William Lam // 6 Comments

Early last year, the new Apple Mac Pro 6,1 (aka black can design) was certified and fully supported on vSphere 6.0 which I had blogged about here. Several months later, customers discovered that some of the newer Mac Pro 6,1 units were shipping with different model of their PCIe SSD device than what was originally released at GA. This was problematic because ESXi was not aware of this newer device and could not detect during or after installation. Although a work around was identified for customers looking to install either ESXi 5.x or 6.x on the newer Apple Mac Pros, it definitely was not ideal.

It has taken a bit longer than expected, but the issue has now been resolved with the latest release of ESXi 6.0 Update 2. A similar fix will be available for customers running ESXi 5.5 in a future update. You can find the direct download for ESXi 6.0 Update 2 in link below which includes a pointer to the release notes in case you are interested in other fixes included in this release.

  • vSphere ESXi 6.0u2 - https://my.vmware.com/web/vmware/details?downloadGroup=ESXI60U2&productId=491&rPId=10348

Categories // Apple, ESXi, vSphere Tags // apple, ESXi, mac pro, ssd, vSphere 6.0 Update 2

How to update AppCatalyst's default PhotonOS VM template w/Docker 1.9?

12.19.2015 by William Lam // 9 Comments

For those of you using VMware's free AppCatalyst Hypervisor, you may have noticed that there is currently not a way to update to the latest Docker 1.9 Engine/Client using Photon's package manager, Tiny Dandified YUM (tndf). Although you can manually install Docker 1.9 on any deployed PhotonOS VMs from AppCatalyst, the only issue with that is that all VMs based off of the default PhotonOS template will still be running version 1.8, which means you would need to apply to do this on ever new VM creation.

Not ideal at the moment, but there is a simple fix which is to update the default PhotonOS template with Docker 1.9. We can easily this simply by leveraging AppCatalyst itself to update itself 😉 or rather its default PhotonOS VMDK. Below are the manual steps if you wish to walk through this yourself, but if you rather just run a simple script that will compeltely automate the entire process, just jump straight to the bottom of this article 🙂

Step 1 - Create a new temp PhotonOS VM (in my example, I'm calling it PHOTON-DOCKER-1.9) which we will use to install Docker 1.9. You can do so by running the following command:

/opt/vmware/appcatalyst/bin/appcatalyst vm create PHOTON-DOCKER-1.9

update-docker-client-to-19-in-appcatalyst-photonos-template-1
Step 2 - Power on the temp PhotonOS VM that you just created by running the following command:

/opt/vmware/appcatalyst/bin/appcatalyst vmpower on PHOTON-DOCKER-1.9

update-docker-client-to-19-in-appcatalyst-photonos-template-2
Step 3 - Retrieve the IP Address of the temp PhotonOS by running the following command (this could take up to a minute or so to display):

/opt/vmware/appcatalyst/bin/appcatalyst guest getip PHOTON-DOCKER-1.9

update-docker-client-to-19-in-appcatalyst-photonos-template-3
Step 4 - We can now SSH to the temp PhotonOS by using the IP Address from the previous step. You will need to specify the private key to login to the PhotonOS by running the following command:

ssh -i /opt/vmware/appcatalyst/etc/appcatalyst_insecure_key photon@[IP-ADDRESS]

update-docker-client-to-19-in-appcatalyst-photonos-template-4
Step 5 - Now we will download and install Docker 1.9 but before doing so we also need to grab the "tar" utility as it does not seem to be part of the default PhotonOS. Here is a one-liner that will automatically install the tar utility and then perform the download and install of Docker (Thanks to Massimo Re'Ferre for his original install steps, just polishing up his awesomeness). Copy and paste the snippet below which you will run that inside of the PhotonOS:

sudo tdnf -y install tar;curl -O https://get.docker.com/builds/Linux/x86_64/docker-1.9.1.tgz;tar -zxvf docker-1.9.1.tgz;sudo systemctl stop docker;sudo cp usr/local/bin/docker /usr/bin/docker;sudo systemctl start docker;rm -rf usr/;rm -f docker-1.9.1.tgz;exit

update-docker-client-to-19-in-appcatalyst-photonos-template-5
Step 6 - Now that we have our PhotonOS updated with Docker 1.9, we just need to shut it down and replace the VMDK with AppCatalyst's default PhotonOS VMDK. Run the following command to find the name of your temp PhotonOS VMDK.

find "${HOME}/Documents/AppCatalyst/PHOTON-DOCKER-1.9" -name '*.vmdk'

Once you have the VMDK name, you should backup the original AppCatalyst's PhotonOS VMDK by running the following command:

sudo mv /opt/vmware/appcatalyst/photonvm/photon-disk1-cl1.vmdk /opt/vmware/appcatalyst/photonvm/photon-disk1-cl1.vmdk.bak

Next, we will copy our temp PhotonOS VMDK to AppCatalyst's default PhotonOS directory and replace its original VMDK by running the following command:

sudo cp ${HOME}/Documents/AppCatalyst/PHOTON-DOCKER-1.9/photon-disk1-cl2.vmdk /opt/vmware/appcatalyst/photonvm/photon-disk1-cl1.vmdk

Finally, we need to make sure the new VMDK has the correct permissions by running the following command:

sudo chmod 644 /opt/vmware/appcatalyst/photonvm/photon-disk1-cl1.vmdk

Step 7 - At this point, you can verify that your changes were successful by creating a new PhotonOS VM and once logged into the VM, you can run "docker version" to verify that you are now running Docker 1.9 as shown in the screenshot below.

update-docker-client-to-19-in-appcatalyst-photonos-template-6
For those those of you who do not wish to go through the manual steps, here is a quick script called update_docker_client_in_appcatalyst.sh which automates this entire process describe in the instructions above. Here is a quick screenshot of a sample execution of the script. I am hoping the Photon team will be updating the tdnf online repo so that you can simple run yum -y update docker in the future.

update-docker-client-to-19-in-appcatalyst-photonos-template-7

Categories // Apple, Automation, Cloud Native, Docker Tags // appcatalyst, Docker, Photon, tdnf

  • « Previous Page
  • 1
  • …
  • 10
  • 11
  • 12
  • 13
  • 14
  • …
  • 26
  • Next Page »

Search

Thank Author

Author

William is Distinguished Platform Engineering Architect in the VMware Cloud Foundation (VCF) Division at Broadcom. His primary focus is helping customers and partners build, run and operate a modern Private Cloud using the VMware Cloud Foundation (VCF) platform.

Connect

  • Bluesky
  • Email
  • GitHub
  • LinkedIn
  • Mastodon
  • Reddit
  • RSS
  • Twitter
  • Vimeo

Recent

  • Automating the vSAN Data Migration Pre-check using vSAN API 06/04/2025
  • VCF 9.0 Hardware Considerations 05/30/2025
  • VMware Flings is now available in Free Downloads of Broadcom Support Portal (BSP) 05/19/2025
  • VMUG Connect 2025 - Minimal VMware Cloud Foundation (VCF) 5.x in a Box  05/15/2025
  • Programmatically accessing the Broadcom Compatibility Guide (BCG) 05/06/2025

Advertisment

Privacy & Cookies: This site uses cookies. By continuing to use this website, you agree to their use.
To find out more, including how to control cookies, see here: Cookie Policy

Copyright WilliamLam.com © 2025


Loading Comments...