 During the early development of vSphere 6.0, one of the features that I got an early sneak preview of was the Content Library which originated from vCloud Director's Content Catalog capability and has now been pushed down into the core vSphere platform as part of VCD's "Convergence" plan.
Although there are some initial limitations with this first release of Content Library such as not being able to mount an ISO directly from the Content Library as example, which I do agree it should have just worked and not requiring a manual datastore browse for this operation to work. I know the Engineering team is aware of this as it was something our team had also provided feedback among other things, so hopefully this will be fixed very shortly.
Having said that, I do see a huge potential with the Content Library and all the interesting use cases it can enable not only for vSphere but also for other products such as vRealize Automation as well as vCloud Air. One area that caught my attention when I first heard about Content Library is the the fact that the publishing and subscription capability works over simple HTTP(s). I immediately had a light-bulb moment and thought would it not be cool if you could have a custom Content Library that would be hosted on some external cloud storage such as Amazon S3 as en example and be able to publish that so others could subscribe to it in their vSphere environment?
Fortunately, because Content Library works over standard HTTP(s) and with the help of one of the Content Library Engineers I was able to create my very own vGhetto Nested ESXi Template Content Library for both vSphere 6.0 and vCloud Directory based environments which is currently being hosted on Amazon S3.
- vSphere: https://s3-us-west-1.amazonaws.com/vghetto-content-library/lib.json
- vCD: https://s3-us-west-1.amazonaws.com/vghetto-content-library-vcd/lib.json
The library contains all of my Nested ESXi / VSAN OVF Templates that I have created over the years and by publishing them in in my public Content Library, anyone can now easily subscribe and pull down the latest OVF templates to deploy directly in their vSphere/vCD environment. You no longer have to manually download the OVFs and as I add new content, the Content Library will automatically synchronize the changes to your local environment.
The vGhetto Nested ESXi Template Content Library currently contains the following 7 OVF's which total to 1.43MB:
- Nested-ESXi-3-Node-VSAN-6.0-All-Flash-Template
- Nested-ESXi-3-Node-VSAN-6.0-Template
- Nested-ESXi-3-Node-VSAN-Template
- Nested-ESXi-32-Node-VSAN-Template (not available when subscribing from VCD)
- Nested-ESXi-6-Node-VSAN-6.0-FD-Template
- Nested-ESXi-64-Node-VSAN-6.0-Template (not available when subscribing from VCD)
- Nested-ESXi-VM-Template
Here are the instructions for subscribing to my vGhetto Content Library using the vSphere 6.0 Web Client:
Step 1 - In the main Home page, click on the Content Library icon

Step 2 - Create a new Content Library which will be used to subscribe to my vGhetto Content Library.

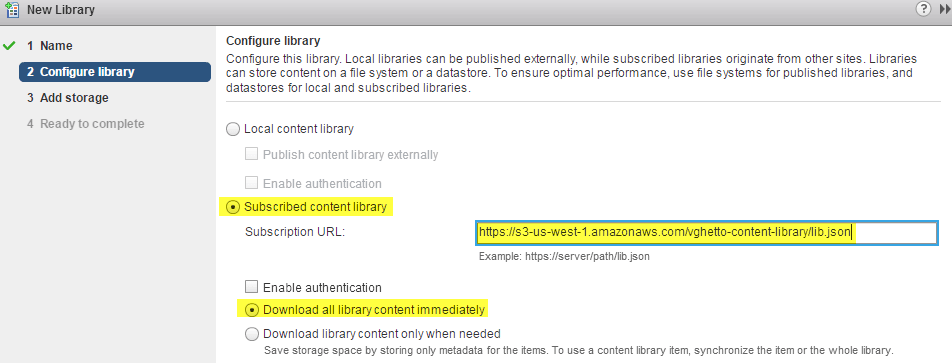
Step 3 - Select "Subscribed content library" and enter the following URL: https://s3-us-west-1.amazonaws.com/vghetto-content-library/lib.json and make sure to select "Download all library content immediately". There is currently a limitation in the way the metadata is read from OVFs that prevents the on-demand setting to be used when subscribing to 3rd party Content Libraries.
Step 4 - Select the storage which will be backing your Content Library. This can be either a local filesystem path on your vCenter Server or by using a vSphere Datastore.

Step 5 - If the new Content Library had been successfully created, the content will start to synchronize to your local system and once the OVF/VM icon appears, then you know the Nested ESXi / VSAN OVFs templates are ready to be deployed in your environment as seen in the screenshot below.

Note: You will notice that even though we are pulling down all seven OVF templates, they are only consume a measly 1.43MB as these are empty VMs shells and I am also using the OVF Dynamic Disks feature which allows you to specify the size of the VMDK upon deployment.
UPDATE (4/24) - It turns out that 3rd Party Content Libraries can also be subscribed from within vCloud Director but because it does not support Dynamic Disks, the synchronized will fail. I have created a separate library specifically optimized for vCD which you can find the URL at the top and you can then subscribe to my vGhetto Content Library as seen in the screenshot below. You will notice that the 32 and 64 Node VSAN Template is not available and the reason for this is that apparently there is a limitation in the number of elements it can parse.

This is a pretty powerful feature in my opinion and I can already see custom content libraries not only from VMware but also from our partner eco-systems providing their latest solutions (Virtual Appliances) as well as other file content as Content Library can store pretty much anything. In a future blog post, I will go through the details on how you can create your own custom Content Library, so stay tune. In the mean time, if you are using vSphere 6.0 and and would like to be able to quickly pull down the latest Nested ESXi / VSAN OVF templates, be sure to subscribe to my vGhetto Content Library!


