WilliamLam.com

  • About
    • About
    • Privacy
  • VMware Cloud Foundation
  • VKS
  • Homelab
    • Resources
    • Nested Virtualization
  • VMware Nostalgia
  • Apple

VSAN Management 6.2 API Quick Reference

05.31.2016 by William Lam // 2 Comments

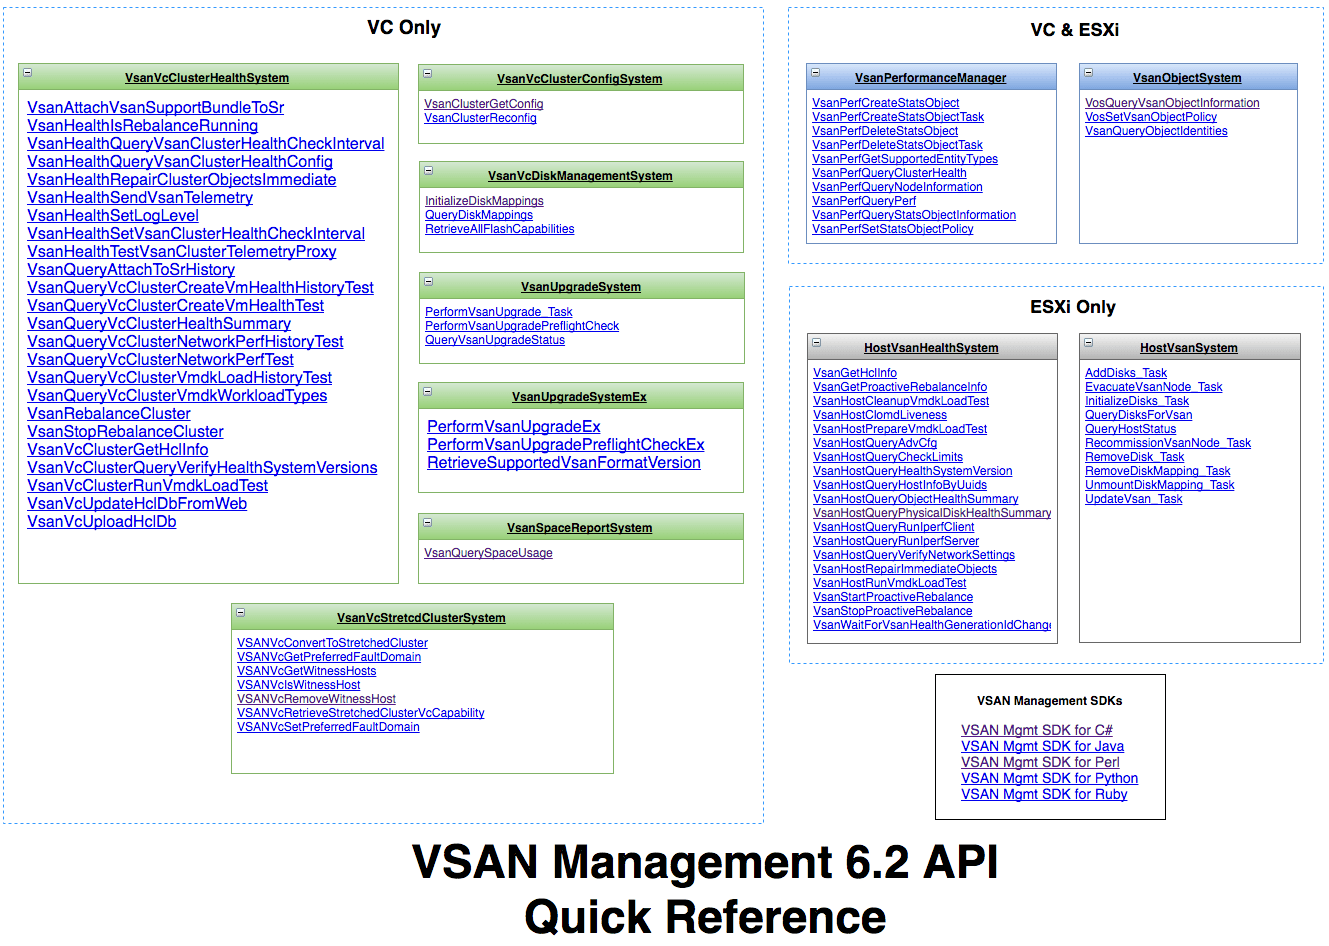
With the release of VSAN 6.2 (vSphere 6.0 Update 2), a new VSAN Management API has been introduced which covers all aspects of VSAN functionality including: complete lifecycle (install, upgrade, patch), monitoring (including VSAN Observer capabilities), configuration and troubleshooting. Although there is a well documented VSAN Management API Reference Guide which you can navigate around, I personally find it useful to be able to have a quick reference to all the APIs in on place which I can easily search and reference. This is especially true when I am learning about a new API.

With that, I have created a "Quick Reference" of the new VSAN 6.2 Management API. You can find a screenshot below as well as the direct link to the quick reference. I used Draw.io to create the diagram but it is not just a static image of all the new Managed Objects and their respective methods, but each API method also links back to the VSAN Management API Reference Guide and best of all, because it is in HTML, you can easily search in the quick reference itself.

I initially had created this for myself, but I figure that others could also benefit. I am curious if others find this useful and whether we should have something like this as part of the official VSAN Management API Reference Guide?

VSAN Management 6.2 API Quick Reference: https://s3.amazonaws.com/virtuallyghetto-download/vsanapi.html

vsan62-management-api-quick-reference

Categories // Automation, ESXi, VSAN, vSphere 6.0 Tags // Virtual SAN, VSAN, VSAN 6.2, vSphere API

Getting started with the new VSAN 6.2 Management API

03.17.2016 by William Lam // 4 Comments

As I have previously written, with the release of VSAN 6.2 (vSphere 6.0 Update 2), a new VSAN Management API has been introduced which allows developers, partners and administrators to automate all aspects of VSAN functionality including: complete lifecycle (install, upgrade, patch), monitoring (including RVC and VSAN Observer capabilities), configuration and troubleshooting. Simply put, anything that you can do from the vSphere Web Client UI or the RVC CLI from a VSAN standpoint, you will be able to completely automate using one of the four new VSAN Management SDKs: Python, Ruby, Java and C#.

In this article, I will show you how to quickly get started with the new VSAN Management API by exercising two of the VSAN Management SDKs: Python and Ruby. Another must bookmark is the VSAN Management API Reference Guide which provides more details on the individual APIs and how they work.

Step 1 - Download the VSAN Management SDK of your choice. You can find the VSAN Management SDK downloads in either of two locations:

  • VMware Developer Center, under the SDK tab
  • vSphere Download page under Automation Tools & SDK(s) Tab

In this example, I will be using the VSAN Management for Python and Ruby.

Step 2 - Extract the VSAN Management SDK zip file which should give you a directory that contains a README on how to setup the SDK and three folders as shown in the screenshot below:

Screen Shot 2016-03-17 at 6.27.58 AM
The bindings directory contains the language specific library to the VSAN Management API. The docs folder contains the offline copy of the VSAN Management API Reference Guide and lastly the sample directory contains a basic sample to connect to VSAN Cluster as well as an individual ESXi host contributing to a VSAN Cluster.

Step 3 - Each of the VSAN Management SDKs extends the existing vSphere Management SDKs. This means that you will need to have the appropriate vSphere Management SDK installed on your system before you can proceed further. In our example, Python requires pyvmomi (vSphere SDK for Python) and Ruby requires rbvmomi (vSphere SDK for Ruby). If you are on Mac OS X, it is pretty easy to install these packages. Make sure you are running the latest version of these SDKs.

Installing pyvmomi:

pip install pyvmomi

Upgrading pyvmomi: (if you already have it installed)

pip install --upgrade pyvmomi

Installing rbvmomi:

gem install rbvmomi

Step 4 - Copy the VSAN Management SDK library file over to the samples directory.

VSAN Mgmt SDK for Python:

cp bindings/vsanmgmtObjects.py samplecode/

VSAN Mgmt SDK for Ruby:

cp bindings/vsanmgmt.api.rb samplecode/

Step 5 - At this point, we can quickly verify that everything was setup correctly by going into the samplecode directory and then run one of the following commands below. If everything is working as expected, then you should see the usage information being printed out. If you do not, the issue is most likely with vSphere Management SDK either not being the latest version or not configured in the default library path for the sample to access.

VSAN Mgmt SDK for Python:

python vsanapisamples.py

Screen Shot 2016-03-17 at 6.43.32 AM
VSAN Mgmt SDK for Ruby:

ruby vsanapisamples.rb

Screen Shot 2016-03-17 at 6.43.56 AM
Step 6 - Now that we have verified our VSAN Management SDK installation was successful, we can now connect to a real VSAN Cluster. To do so, run the following command and specify your vCenter Server along with the credentials as well as the name of the VSAN Cluster. If successful, you should see the status for each of your VSAN hosts and its current state as seen in the screenshot below.

VSAN Mgmt SDK for Python:

python vsanapisamples.py -s 192.168.1.139 -u '*protected email*' -p 'VMware1!' --cluster VSAN-Cluster

Screen Shot 2016-03-17 at 6.54.38 AM
VSAN Mgmt SDK for Ruby:

ruby vsanapisamples.rb -o 192.168.1.139 -u '*protected email*' -k -p 'VMware1!' VSAN-Cluster

Screen Shot 2016-03-17 at 6.56.34 AM
Step 7 - Each individual ESXi hosts that participate in the VSAN Cluster also exposes an VSAN Management API endpoint. We can use this exact same sample to connect to one of the hosts to get some additional information. To do so, run the following command and specify your ESXi hosts along with the credentials.

VSAN Mgmt SDK for Python:

python vsanapisamples.py -s 192.168.1.190 -u root -p vmware123

Screen Shot 2016-03-17 at 7.00.28 AM
VSAN Mgmt SDK for Ruby:

ruby vsanapisamples.rb -o 192.168.1.190 -u root -p vmware123

Screen Shot 2016-03-17 at 6.59.46 AM
As you can see, it is pretty straight forward on getting the new VSAN Management SDK up and running. The provided sample only scratches the surface of what is possible and for a complete list of capabilities within the new VSAN Management API, be sure to check out the VSAN Management API Reference document for more information. I am really looking forward to seeing what solutions our customers and partners develop using this new API. If you would like to contribute code samples back to the community or just find new samples be sure to check out the VMware Developer Center Sample Exchange. 

Categories // Automation, VSAN Tags // python, pyVmomi, rbvmomi, ruby, Virtual SAN, VSAN 6.2, vSphere 6.0 Update 2, vSphere API

VSAN 6.2 (vSphere 6.0 Update 2) homelab on 6th Gen Intel NUC

03.03.2016 by William Lam // 33 Comments

As many of you know, I have been happily using an Apple Mac Mini for my personal vSphere home lab for the past few years now. I absolutely love the simplicity and the versatility of the platform to easily run a basic vSphere lab to being able to consume advanced capabilities of the vSphere platform like VMware VSAN or NSX for example. The Mac Mini's also supports more complex networking configurations by allowing you to add an additional network adapter which leverages the built-in Thunderbolt adapter which many other similar form factors lack. Having said that all that, one major limitation with the Mac Mini platform has always been the limited amount of memory it can support which is a maximum of 16GB (same limitation as other form factors in this space). Although it is definitely possible to run a vSphere lab with only 16GB of memory, it does limit you some what on what you can deploy which is challenging if you want to explore other solutions like VSAN, NSX and vRealize.

I was really hoping that Apple would have released an update to their Mac Mini platform last year that would include support for 32GB of memory, but instead it was a very minor update and was mostly a let down which you can read more about here. Earlier this year, I found out from fellow blogger Florian Grehl that Intel has just released their 6th generation of the Intel NUC which officially adds support for 32GB of memory. I have been keeping an eye on the Intel NUC for some time now but due to the same memory limitation as the Mac Mini, I had never considered it as viable option, especially given that I own a Mac Mini already. With the added support for 32GB of memory and the ability to house two disk drives (M.2 and 2.5"), this was the update I was finally waiting for to pull the trigger and refresh my home lab given 16GB was just not cutting it for the work I was doing anymore.

There have been quite a bit of interest in what I ended up purchasing for running VSAN 6.2 (vSphere 6.0 Update 2) which has not GA'ed ... yet and so I figure I would together a post with all the details in case others were looking to build a similar lab. This article is broken down into the following sections:

  • Bill of Materials (BOM)
  • Installation
  • VSAN Configuration
  • Final Word

Disclaimer: The Intel NUC is not on VMware's official Hardware Compatibility List (HCL) and there for is not officially supported by VMware. Please use this platform at your own risk.

Bill of Materials (BOM)

vsan62-intel-nuc-bom
Below are the components with links that I used for my configuration which is partially based on budget as well as recommendations from others who have a similar setup. If you think you will need more CPU horsepower, you can look at the Core i5 (NUC6i5SYH) model which is slightly more expensive than the i3. I opted for an all-flash configuration because I not only wanted the performance but I also wanted to take advantage of the much anticipated Deduplication and Compression feature in VSAN 6.2 which is only supported with an all-flash VSAN setup. I also did not have a need for large amount of storage capacity, but you could also pay a tiny bit more for the exact same drive giving you a full 1TB if needed. If you do not care for an all-flash setup, you can definitely look at spinning rust which can give you several TB's of storage at a very reasonable cost. The overall cost of the system for me was ~$700 USD (before taxes) and that was because some of the components were slightly discounted through the use of a preferred retailer that my employer provided. I would highly recommend you check with your employer to see if you have similiar HR benefits as that can help with the cost if that is important to you. The SSDs actually ended up being cheaper on Amazon and so I ended up purchasing them there. 

  • 1 x Intel NUC 6th Gen NUC6i3SYH (supports 2 drives: M.2 & 2.5)
  • 2 x Crucial 16GB DDR4
  • 1 x Samsung 850 EVO 250GB M.2 for “Caching” Tier (Thanks to my readers, decided to upgrade to 1 x Samsung SM951 NVMe 128GB M.2 for "Caching" Tier)
  • 1 x Samsung 850 EVO 500GB 2.5 SATA3 for “Capacity” Tier

Installation

vsan62-intel-nuc-1
The installation of the memory and the SSDs on NUC was super simple. You just need a regular phillips screwdriver and there were four screws at the bottom of the NUC that you will need to unscrew. Once loosen, you just need to flip the NUC unit back on top while holding the bottom and slowly taking the top off. The M.2 SSD requires a smaller phillips screwdriver which you will need to unscrew before you can plug in the device. The memory just plugs right in and you should hear a click to confirm its inserted all the way. The 2.5" SSD just plugs into the drive bay which is attached to the top of the NUC casing. If you are interested in more details, you can find various unboxing and installation videos online like this one. 

UPDATE (05/25/16): Intel has just released BIOS v44 which fully enables unleashes the power of your NVMe devices. One thing to note from the article is that you do NOT need to unplug the security device, you can just update BIOS by simply download the BIOS file and loading it onto a USB key (FAT32).

UPDATE (03/06/16): Intel has just released BIOS v36 which resolves the M.2 SSD issue. If you have updated using earlier versions, to resolve the problem you just need to go into the BIOS and re-enable the M.2 device as mentioned in this blog here.

One very important thing to note which I was warned about by a fellow user was NOT to update/flash to a newer version of the BIOS. It turns out that if you do, the M.2 SSD will fail to be detected by the system which sounds like a serious bug if you ask me. The stock BIOS version that came with my Intel NUC is SYSKLi35.86A.0024.2015.1027.2142 in case anyone is interested. I am not sure if you can flash back the original version but another user just informed me that they had accidentally updated the BIOS and now he can no longer see the M.2 device 🙁

For the ESXi installation, I just used a regular USB key that I had lying around and used the unetbootin tool to create a bootable USB key. I am using the upcoming ESXi 6.0 Update 2 (which has not been released ... yet) and you will be able to use the out of the box ISO that is shipped from VMware. There are no additional custom drivers that are required. Once the ESXi installation loads up, you can then install ESXi back onto the same ESXi USB key which it initially boot it up. I know this is not always common knowledge and as some may think you need an additional USB device to install ESXi. Ensure you do not install anything on the two SSDs if you plan to use VSAN as it requires at least (2 x SSD) or (1 x SSD and 1 x MD).

vsan62-intel-nuc-3
If you are interested in adding a bit of personalization to your Intel NUC setup and replace the default Intel BIOS splash screen like I have, take a look at this article here for more details.

custom-vsan-bios-splash-screen-for-intel-nuc-0
If you are interested in adding additional network adapters to your Intel NUC via USB Ethernet Adapter, have a look at this article here.

VSAN Configuration

Bootstrapping VSAN Datastore:

  • If you plan to run VSAN on the NUC and you do not have additional external storage to deploy and setup things like vCenter Server, you have the option to "bootstrap" VSAN using a single ESXi node to start with which I have written in more detail here and here. This option allows you to setup VSAN so that you can deploy vCenter Server and then help you configure the remainder nodes of your VSAN cluster which will require at least 3 nodes unless you plan on doing a 2-Node VSAN Cluster with the VSAN Witness Appliance. For more detailed instructions on bootstrapping an all-flash VSAN datastore, please take a look at my blog article here.
  • If you plan to *ONLY* run a single VSAN Node which is possible but NOT recommended given you need a minimum of 3 nodes for VSAN to properly function. After the vCenter Server is deployed, you will need to update the default VSAN VM Storage Policy to ether allow "Forced Provisioning" or changing the FTT from 1 to 0 (e.g. no protection given you only have a single node). This will be required else you will run into provisioning issues as VSAN will prevent you from deploying VMs as it is expecting two additional VSAN nodes. When logged into the home page of the vSphere Web Client, click on "VM Storage Policies" icon and edit the "Virtual SAN Default Storage Policy" and change the following values as show in the screenshot below:

Screen Shot 2016-03-03 at 6.08.16 AM

Installing vCenter Server:

  • If you are new to deploying the vCenter Server, VMware has a deployment guide which you can follow here.

Optimizations:

  • In addition, because this is for a home lab, my buddy Cormac Hogan has a great tip on disabling device monitoring as the SSD devices may not be on the VMware's official HCL and can potentially negatively impact your lab environment. The following ESXCLI command needs to be run once on each of the ESXi hosts in the ESXi Shell or remotely:

esxcli system settings advanced set -o /LSOM/VSANDeviceMonitoring -i 0

  • I also recently learned from reading Cormac's blog that there is also new ESXi Advanced Setting in VSAN 6.2 which allows VSAN to provision a VM swap object as "thin" versus "thick" which has been the historically default. To disable the use of "thick" provisioning, you will need to run the following ESXCLI command on each ESXi host:

esxcli system settings advanced set -o /VSAN/SwapThickProvisionDisabled -i 1

  • Lastly, if you plan to run Nested ESXi VMs on top of your physical VSAN Cluster, be sure to add this configuration change outlined in this article here, else you may see some strangeness when trying to create VMFS volumes.

vsan62-intel-nuc-2

Final Word

I have only had the NUC for a couple of days but so far I have been pretty impressed with the ease of setup and the super tiny form factor. I thought the Mac Mini's were small and portable, but the NUC really blows it out of the water. I was super happy with the decision to go with an all-flash setup, the deployment of the VCSA was super fast as you would expect. If I compare this to my Mac Mini which had spinning rust, for a portion of the VCSA deployment, the fan would go a bit psycho and you can feel the heat if you put your face close to it. I could barely feel any heat from the NUC and it was dead silent which is great as it sits in our living room. Like the Mac Mini, the NUC has regular HDMI port which is great as I can connect it directly to our TV and has plenty of USB ports which could come in handy if you wanted to play with VSAN using USB-based disks 😉

vsan62-intel-nuc-4
One neat idea that Duncan Epping had brought up in a recent chat with him was to run a 2-Node VSAN Cluster and have the VSAN Witness appliance running on a desktop or laptop. This would make for a very simple and affordable VSAN home lab without requiring a 3rd physical ESXi node. I had also thought about doing the same but instead of 2 NUCs, I would be combining my Mac Mini and NUC to form the 2-Node VSAN Cluster and then run the VSAN Witness on my iMac desktop which has 16GB of memory. This is just another slick way you can leverage this new and powerful platform to run a full blow VSAN setup. For those of you following my blog, I am also looking to see if there is a way to add a secondary network adapter to the NUC by the way of a USB 3.0 based ethernet adapter. I have already shown that it is definitely possible with older releases of ESXi and if this works, could make the NUC even more viable.

Lastly, for those looking for a more beefier setup, there are rumors that Intel maybe close to releasing another update to the Intel NUC platform code named "Skull Canyon" which could include a Quad-Core i7 (Broadwell based) along with supporting the new USB-c interface which would be able to run Thunderbolt 3. If true, this could be another option for those looking for a bit more power for their home lab.

A few folks had been asking what I plan to do with my Mac Mini now that I have my NUC. I probably will be selling it, it is still a great platform and has Core i7 which definitely helps with any CPU intensive tasks. It also supports two drives, so it is quite inexpensive to purchase another SSD as it already comes with one to setup an all-flash VSAN 6.2 setup. Below are the the specs and If you interested in the setup, feel free to drop me an email at info.virtuallyghetto [at] gmail [dot] com.

  • Mac Mini 5,3 (Late 2011)
  • Quad-Core i7 (262635QM)
  • 16GB memory
  • 1 x SSD (120GB) Corsair Force GT
  • 1 x MD (750 GB) Seagate Momentus XT
  • 1 x built-in 1Gbe Ethernet port
  • 1 x Thunderbolt port
  • 4 x USB ports
  • 1 x HDMI
  • Original packaging available
  • VSAN capable
  • ESXi will install OOTB w/o any issues

Additional Useful Resources:

  • http://www.virten.net/2016/01/vmware-homeserver-esxi-on-6th-gen-intel-nuc/
  • http://www.ivobeerens.nl/2016/02/24/intel-nuc-6th-generation-as-home-server/
  • http://www.sindalschmidt.me/how-to-run-vmware-esxi-on-intel-nuc-part-1-installation/

Categories // ESXi, Home Lab, Not Supported, VSAN, vSphere 6.0 Tags // ESXi 6.0, homelab, Intel NUC, notsupported, Virtual SAN, VSAN, VSAN 6.2, vSphere 6.0 Update 2

Search

Thank Author

Author

William is Distinguished Platform Engineering Architect in the VMware Cloud Foundation (VCF) Division at Broadcom. His primary focus is helping customers and partners build, run and operate a modern Private Cloud using the VMware Cloud Foundation (VCF) platform.

Connect

  • Bluesky
  • Email
  • GitHub
  • LinkedIn
  • Mastodon
  • Reddit
  • RSS
  • Twitter
  • Vimeo

Recent

  • Programmatically accessing the Broadcom Compatibility Guide (BCG) 05/06/2025
  • Quick Tip - Validating Broadcom Download Token  05/01/2025
  • Supported chipsets for the USB Network Native Driver for ESXi Fling 04/23/2025
  • vCenter Identity Federation with Authelia 04/16/2025
  • vCenter Server Identity Federation with Kanidm 04/10/2025

Advertisment

Privacy & Cookies: This site uses cookies. By continuing to use this website, you agree to their use.
To find out more, including how to control cookies, see here: Cookie Policy

Copyright WilliamLam.com © 2025


Loading Comments...