WilliamLam.com

  • About
    • About
    • Privacy
  • VMware Cloud Foundation
  • VKS
  • Homelab
    • Hardware Options
    • Hardware Reviews
    • Lab Deployment Scripts
    • Nested Virtualization
    • Homelab Podcasts
  • VMware Nostalgia
  • Apple

Search Results for: nested esxi

Test driving VMware Photon Controller Part 1: Installation

04.12.2016 by William Lam // 11 Comments

Several weeks back, the Cloud Native Apps team at VMware released a significant update to their Photon Controller platform with their v0.8 release focused on simplified management and support for Production scale. For those of you who are not familiar with Photon Controller, it is an infrastructure stack purposefully-built for cloud-native applications. It is a highly distributed and scale-out control plane designed from the ground up to support multi-tenant deployments that require elasticity, high churn and self-healing. If you would like to get more details about the v0.8 release, be sure to check out this blog post here by James Zabala, Product Manager in the Cloud Native Apps team.

photon-controller-architecture
One of the most visible enhancement to the v0.8 release is the introduction of a UI for installing and managing Photon Controller. Previously, the only way to deploy Photon Controller was using an already pre-configured appliance that required customers to have a particular network configuration for their infrastructure. Obviously, this was not ideal and it made it challenging for customers to evaluate Photon Controller in their own specific environment. With this new update, customers can now easily deploy Photon Controller into their own unique environment using a UI that is provided by a Virtual Appliance (OVA). This Virtual Appliance is only used for the initial deployment of Photon Controller and is no longer needed afterwards. Once Photon Controller is up and running, you can manage it using either the CLI or the new management UI.

In this first article, I will take you through the steps of deploying Photon Controller onto an already provisioned ESXi host. We have a quick look at the Photon CLI and how you can interact with Photon Controller and lastly, we will also take a look at the new Photon Controller Management UI. In future articles, we will be looking at deploying our first VM using Photon Controller as well as run through the different cluster orchestration solutions that Photon Controller integrates with.

  • Test driving VMware Photon Controller Part 1: Installation
  • Test driving VMware Photon Controller Part 2: Deploying first VM
  • Test driving VMware Photon Controller Part 3a: Deploying Kubernetes
  • Test driving VMware Photon Controller Part 3b: Deploying Mesos
  • Test driving VMware Photon Controller Part 3c: Deploying Docker Swarm

To start using Photon Controller, you will need at least one physical ESXi 6.x host (4vCPU / 16GB memory / 50GB storage) with some basic networking capabilities which you can read more about here. Obviously, if you really want to see what Photon Controller in action and what it can do, having additional hosts will definitely help. If you do not have a dedicated ESXi host for use with Photon Controller, the next best option is to leverage Nested ESXi. The more resources you can allocate to the Nested ESXi VM, the better your experience will be in addition to the number of cluster orchestration workflows you will be able to exercise. If you have access to a physical ESXi host, you can skip steps 2 through 4.

For this exercise, I will be using my Apple Mac Mini which is running the latest version of ESXi 6.0 Update 2 and has 16GB of available memory and 100+GB of local storage.

Deploying Photon Controller

Step 1 - Download both the Photon Controller Installer OVA as well as the Photon CLI for your OS platform from here.

Step 2 - Deploy the Photon Controller Installer OVA using either the ovftool CLI directly against an existing ESXi host or using the vSphere Web/C# Client connected to a vCenter Server. For more detailed instructions, please have a look at this blog article here.

Step 3 (optional) - Download the Nested ESXi 6.x Virtual Appliance which you can find here which also includes instructions on how to deploy the Nested ESXi VA. Make sure the version of the Nested ESXi 6.x VA version is v5.0 as earlier versions will not work. You can refer to the screenshot in the next step if you are wondering where to look.

Step 4 -(optional) Deploy the Nested ESXi OVA with at least 4vCPU, 16GB of memory and increase the storage for the 3rd VMDK to at least 50GB. If you have vCenter Server, you can deploy by using either the vSphere Web or C# Client as shown in the screenshot below:

photon-controller-using-nested-esxi-16
Make sure you enable SSH (currently required for Photon Controller) and enable local datastore unless you have shared storage to connect to the Nested ESXi VM (VSAN is currently not supported with Photon Controller at this time). If you only have an ESXi host, then you can deploy using the ovftool CLI which can be downloaded here and follow the instructions found here.

Note: If you have more than one Nested ESXi VM, you will need to setup shared storage else you may run into issues when images are being replicated across the hosts. The other added benefit is that you are not wasting local storage just to replicate the same images over and over.

At this point, you should have the Photon Controller Installer VM running and at least one physical or Nested ESXi  powered on and ready to go.

UPDATE (04/25/16): Please have a look at this article on How to override the default CPU/Memory when deploying Photon Controller Management VM? which can be very helpful for resource constrained environments.

Step 6 - Next, open a browser to the IP Address of your Photon Controller Installer VM whether that was an IP Address you had specified or on that it was automatically obtained via DHCP. You should be taken to the installer screen as seen in the screenshot below.

testing-driving-photon-controller-part1-0
Step 7 - Click on the "Get Started" button and then accept the EULA.

Step 8 - The next section is "Management" where you will define the ESXi host(s) to run the Photon Controller Management VMs. If you only have one ESXi host, then you will also want to check the "Also use as Cloud Host" box in which case the ESXi host will be used to run both the Photon Controller management VM as well as the workload VMs. In a real Production environment, you will most likely want to separate these out as a best practice to not mix your management plane with your compute workload.

The Host IP will be the IP Address (yes, you will have to use IP Address as hostnames are not currently supported) of your first ESXi host. Following that, you will then need to provide credentials to the ESXi host as well as the datastore and networking configurations in which the Photon Controller VM will be deployed to.

testing-driving-photon-controller-part1-1
Note: One important thing to note is that the installer will dynamically size the Photon Controller Management VM based on the available resources of the ESXi host. Simply speaking, it will consume as much available resources (taking into considerations powered off VMs if they exists) depending if it is purely a "Management" and/or "Cloud" host.

Step 9 - The next section is "Cloud" where you will specify additional ESXi host(s) that will run your workload. Since we only have a single host, we already accounted for this in previous step and will skip this. If you do have additional hosts, you can specify either individual IPs or a range of IPs. If you have hosts with different credentials, you can add addition logical groups by simply clicking into the "Add host group" icon.

Step 10 - The last page is the "Global Settings" where you have the ability to configure some of the advanced options. For a minimal setup, you only need to specify the share storage for the images as well as deploying a load balancer which is part of the installer itself. If you only have a single host, then you can specify the name of your datastore or the shared datastore in which you have already mounted on your ESXi host. In my environment, the datastore name is datastore1. If you have multiple ESXi hosts that *only* have local datastores, make sure they are uniquely named as there is a known bug that different hosts can not have the same datastore name. In this case, you would list all the datastore names in the box (e.g. datastore1, datastore2).

Make sure to also check the box "Allow cloud hosts to use image datastore for VM Storage" if you wish to allow the VMs to also be deployed to these datastores. All other settings are all optional including deploying the Lightwave identity service, you can refer to the documentation for more details.

testing-driving-photon-controller-part1-2
Step 11 - Finally, before you click on the "Deploy" button, I recommend that you export your current configurations. This allows you to easily adjust the configurations without having to re-enter it into the UI or if you get a failure so you can easily re-try. This a very handy feature and hope to see this in other VMware based installers. Once you are ready, go ahead and click on the "Deploy" button.

testing-driving-photon-controller-part1-3
Depending on environment and resources, the deployment can take anywhere from 5-10 minutes. The installer will discover your ESXi hosts and the resources you had specified earlier, it will then install an agent on each of the ESXi hosts which will allow Photon Controller to communicate with the hosts, deploy the Photon Controller Management VM and then finally upload the necessary images from the Photon Controller Installer VM over to the Image Datastores. If everything was successful, you should see the success screen in the screenshot above.

Note: If you run into any deployment issues, the most common issue is most like resource related. If you did not correctly size the Nested ESXi VM with the minimal configuration, you will definitely run into issues. If you do run into this situation, go ahead and re-size your Nested ESXi VMs and then re-initialize the Photon Controller Installer VM by jumping to the bottom of this article in the Troubleshooting section where I document the process.

Exploring Photon CLI

At this point, we will now switch over to the Photon CLI that you had downloaded earlier to interact with the Installer VM to get some information about our deployed Photon Controller instance. The Photon CLI uses the Photon REST API, so you could also interact with the system using the API rather than the CLI. We will also quickly cover the REST API in this section in case you might be interested in using it.

Step 1 - Another method to verify that our deployment was successful is by pointing our Photon CLI to the IP Address of the Photon Controller Installer VM by running the following command:

./photon target set http://192.168.1.250

testing-driving-photon-controller-part1-4
Step 2 - Here, we will be able to list any of deployments performed by the Installer VM by running the following command:

./photon deployment list

Step 3 - Using the deployment ID from previous step, we can then get more details about a given deployment by running the following command and specifying the ID:

./photon deployment show de4d276f-16c1-4666-b586-a800dc83d4d6

testing-driving-photon-controller-part1-5
As you can see from the output, we get a nice summary of the Photon Controller instance that we just deployed. What you will be looking for here is that the State property shows "Ready" which means we are now ready to start using the Photon Controller platform. From here, we can also see the IP Address of the load balancer that was setup for us within the Photon Controller Management VM which in this example is 192.168.1.150.

Step 4 - To interact with our Photon Controller instance, we will need to point the Photon CLI to the IP Address of the load balancer and specify port 28080. If you had enabled authentication using the Lightwave identity service, you would then use port 443 instead.

./photon target set http://192.168.1.150:28080

Step 5 - You can also check the state of the overall system and the various components once you have pointed to your Photon Controller by running the following command:

./photon system status

testing-driving-photon-controller-part1-6
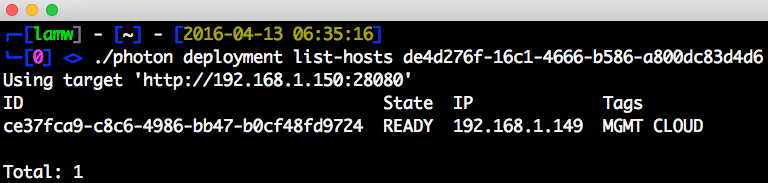
Step 6 - If you want to get the list of ESXi hosts that is part of a given deployment, we can use the deployment ID from Step 2 and then run the following command which will give you some basic information including the functionality of the ESXi host whether it is serving as a "Management" or "Cloud" Host:

./photon deployment list-hosts de4d276f-16c1-4666-b586-a800dc83d4d6

testing-driving-photon-controller-part1-7
Step 7 - To show more details about a given ESXi host, we just need to take the host ID from the previous step and then run the following command:

./photon host show ce37fca9-c8c6-4986-bb47-b0cf48fd9724

testing-driving-photon-controller-part1-8
Note: I had noticed that the ESXi host's root password was being displayed in this output. I have already reported this internally and this will be removed in a future update as it should not be displaying the password, especially in plaintext.

Hopefully this gives you a quick primer on how the Photon CLI works and how you can easily interact with a given Photon Controller deployment. If you would like more details on Photon CLI, be sure to check out the official documentation here.

Exploring Photon Controller API

The Photon Controller also provides a REST API interface which you can explore by using the built in Swagger interface. You can connect to it by opening a browser to the following address: https://[photon-controller-load-balancer]:9000/api For those of you who have not used Swagger before, its a tool that allows you to easily test drive the underlying API as well as providing interactive documentation on the specific APIs that are available. This is a great way to learn about the Photon Controller API and allows you to even try it out without having to write a single line of code.

testing-driving-photon-controller-part1-9

Exploring Photon Controller UI

Saving the best for the last, we will now take a look at the new Photon Controller Management UI. To access the UI, you just need to open a browser to the IP Address of the Photon Controller load balancer. In this example, it is 192.168.1.150 and once loaded, you should be taken to the main dashboard.

testing-driving-photon-controller-part1-10
If you recall earlier in the Photon CLI example, we had to run through several commands to get the overall system status as well as list of ESXi hosts participating in either a "Management" or "Cloud" host role. With the UI, this is literally a single click!

testing-driving-photon-controller-part1-11
There are other objects within the UI that you may notice while exploring but we will save that for the next article in which we will walk through the process provisioning your first Virtual Machine using Photon Controller.

Troubleshooting

Here are some useful things I learned from the Photon Controller team while troubleshooting some of my initial deployments.

The following logs are useful to take a look at during a failed deployment and usually will give some hints to what had happened. You can find these by logging into the Photon Controller Installer VM:

  • /var/log/esxcloud/management-api/management-api.log
  • /var/log/esxcloud/deployer/deployer.log

If you need to restart or re-deploy using the Photon Controller Installer VM, there is some clean up that you need to do (in the future, there will be an easier way to initialize without going through this process). To do so, SSH to Photon Controller Installer VM using the username esxcloud and vmware as the password. Next, you will change over to the root user via the su command and the password will be what you had set earlier:

su - root
rm -rf /etc/esxcloud/deployer/deployer/sandbox_18000/
rm -rf /etc/esxcloud/cloud-store/cloud-store/sandbox_19000/
reboot

Once the Photon Controller Installer VM has started back up, you will need to restart the Docker Container for the UI by running the following command:

docker restart ui_installer

This is required as currently it does not correctly restart upon reboot. This is a known issue and will be fixed in a future update. Before opening a browser to the installer UI, you can run the following command to ensure all Docker Containers have successfully started:

docker ps -a

Screen Shot 2016-04-08 at 3.31.49 PM

Categories // Automation, Cloud Native, ESXi, vSphere 6.0 Tags // cloud native apps, ESXi, Photon Controller

VSAN 6.2 (vSphere 6.0 Update 2) homelab on 6th Gen Intel NUC

03.03.2016 by William Lam // 33 Comments

As many of you know, I have been happily using an Apple Mac Mini for my personal vSphere home lab for the past few years now. I absolutely love the simplicity and the versatility of the platform to easily run a basic vSphere lab to being able to consume advanced capabilities of the vSphere platform like VMware VSAN or NSX for example. The Mac Mini's also supports more complex networking configurations by allowing you to add an additional network adapter which leverages the built-in Thunderbolt adapter which many other similar form factors lack. Having said that all that, one major limitation with the Mac Mini platform has always been the limited amount of memory it can support which is a maximum of 16GB (same limitation as other form factors in this space). Although it is definitely possible to run a vSphere lab with only 16GB of memory, it does limit you some what on what you can deploy which is challenging if you want to explore other solutions like VSAN, NSX and vRealize.

I was really hoping that Apple would have released an update to their Mac Mini platform last year that would include support for 32GB of memory, but instead it was a very minor update and was mostly a let down which you can read more about here. Earlier this year, I found out from fellow blogger Florian Grehl that Intel has just released their 6th generation of the Intel NUC which officially adds support for 32GB of memory. I have been keeping an eye on the Intel NUC for some time now but due to the same memory limitation as the Mac Mini, I had never considered it as viable option, especially given that I own a Mac Mini already. With the added support for 32GB of memory and the ability to house two disk drives (M.2 and 2.5"), this was the update I was finally waiting for to pull the trigger and refresh my home lab given 16GB was just not cutting it for the work I was doing anymore.

There have been quite a bit of interest in what I ended up purchasing for running VSAN 6.2 (vSphere 6.0 Update 2) which has not GA'ed ... yet and so I figure I would together a post with all the details in case others were looking to build a similar lab. This article is broken down into the following sections:

  • Bill of Materials (BOM)
  • Installation
  • VSAN Configuration
  • Final Word

Disclaimer: The Intel NUC is not on VMware's official Hardware Compatibility List (HCL) and there for is not officially supported by VMware. Please use this platform at your own risk.

Bill of Materials (BOM)

vsan62-intel-nuc-bom
Below are the components with links that I used for my configuration which is partially based on budget as well as recommendations from others who have a similar setup. If you think you will need more CPU horsepower, you can look at the Core i5 (NUC6i5SYH) model which is slightly more expensive than the i3. I opted for an all-flash configuration because I not only wanted the performance but I also wanted to take advantage of the much anticipated Deduplication and Compression feature in VSAN 6.2 which is only supported with an all-flash VSAN setup. I also did not have a need for large amount of storage capacity, but you could also pay a tiny bit more for the exact same drive giving you a full 1TB if needed. If you do not care for an all-flash setup, you can definitely look at spinning rust which can give you several TB's of storage at a very reasonable cost. The overall cost of the system for me was ~$700 USD (before taxes) and that was because some of the components were slightly discounted through the use of a preferred retailer that my employer provided. I would highly recommend you check with your employer to see if you have similiar HR benefits as that can help with the cost if that is important to you. The SSDs actually ended up being cheaper on Amazon and so I ended up purchasing them there. 

  • 1 x Intel NUC 6th Gen NUC6i3SYH (supports 2 drives: M.2 & 2.5)
  • 2 x Crucial 16GB DDR4
  • 1 x Samsung 850 EVO 250GB M.2 for “Caching” Tier (Thanks to my readers, decided to upgrade to 1 x Samsung SM951 NVMe 128GB M.2 for "Caching" Tier)
  • 1 x Samsung 850 EVO 500GB 2.5 SATA3 for “Capacity” Tier

Installation

vsan62-intel-nuc-1
The installation of the memory and the SSDs on NUC was super simple. You just need a regular phillips screwdriver and there were four screws at the bottom of the NUC that you will need to unscrew. Once loosen, you just need to flip the NUC unit back on top while holding the bottom and slowly taking the top off. The M.2 SSD requires a smaller phillips screwdriver which you will need to unscrew before you can plug in the device. The memory just plugs right in and you should hear a click to confirm its inserted all the way. The 2.5" SSD just plugs into the drive bay which is attached to the top of the NUC casing. If you are interested in more details, you can find various unboxing and installation videos online like this one. 

UPDATE (05/25/16): Intel has just released BIOS v44 which fully enables unleashes the power of your NVMe devices. One thing to note from the article is that you do NOT need to unplug the security device, you can just update BIOS by simply download the BIOS file and loading it onto a USB key (FAT32).

UPDATE (03/06/16): Intel has just released BIOS v36 which resolves the M.2 SSD issue. If you have updated using earlier versions, to resolve the problem you just need to go into the BIOS and re-enable the M.2 device as mentioned in this blog here.

One very important thing to note which I was warned about by a fellow user was NOT to update/flash to a newer version of the BIOS. It turns out that if you do, the M.2 SSD will fail to be detected by the system which sounds like a serious bug if you ask me. The stock BIOS version that came with my Intel NUC is SYSKLi35.86A.0024.2015.1027.2142 in case anyone is interested. I am not sure if you can flash back the original version but another user just informed me that they had accidentally updated the BIOS and now he can no longer see the M.2 device 🙁

For the ESXi installation, I just used a regular USB key that I had lying around and used the unetbootin tool to create a bootable USB key. I am using the upcoming ESXi 6.0 Update 2 (which has not been released ... yet) and you will be able to use the out of the box ISO that is shipped from VMware. There are no additional custom drivers that are required. Once the ESXi installation loads up, you can then install ESXi back onto the same ESXi USB key which it initially boot it up. I know this is not always common knowledge and as some may think you need an additional USB device to install ESXi. Ensure you do not install anything on the two SSDs if you plan to use VSAN as it requires at least (2 x SSD) or (1 x SSD and 1 x MD).

vsan62-intel-nuc-3
If you are interested in adding a bit of personalization to your Intel NUC setup and replace the default Intel BIOS splash screen like I have, take a look at this article here for more details.

custom-vsan-bios-splash-screen-for-intel-nuc-0
If you are interested in adding additional network adapters to your Intel NUC via USB Ethernet Adapter, have a look at this article here.

VSAN Configuration

Bootstrapping VSAN Datastore:

  • If you plan to run VSAN on the NUC and you do not have additional external storage to deploy and setup things like vCenter Server, you have the option to "bootstrap" VSAN using a single ESXi node to start with which I have written in more detail here and here. This option allows you to setup VSAN so that you can deploy vCenter Server and then help you configure the remainder nodes of your VSAN cluster which will require at least 3 nodes unless you plan on doing a 2-Node VSAN Cluster with the VSAN Witness Appliance. For more detailed instructions on bootstrapping an all-flash VSAN datastore, please take a look at my blog article here.
  • If you plan to *ONLY* run a single VSAN Node which is possible but NOT recommended given you need a minimum of 3 nodes for VSAN to properly function. After the vCenter Server is deployed, you will need to update the default VSAN VM Storage Policy to ether allow "Forced Provisioning" or changing the FTT from 1 to 0 (e.g. no protection given you only have a single node). This will be required else you will run into provisioning issues as VSAN will prevent you from deploying VMs as it is expecting two additional VSAN nodes. When logged into the home page of the vSphere Web Client, click on "VM Storage Policies" icon and edit the "Virtual SAN Default Storage Policy" and change the following values as show in the screenshot below:

Screen Shot 2016-03-03 at 6.08.16 AM

Installing vCenter Server:

  • If you are new to deploying the vCenter Server, VMware has a deployment guide which you can follow here.

Optimizations:

  • In addition, because this is for a home lab, my buddy Cormac Hogan has a great tip on disabling device monitoring as the SSD devices may not be on the VMware's official HCL and can potentially negatively impact your lab environment. The following ESXCLI command needs to be run once on each of the ESXi hosts in the ESXi Shell or remotely:

esxcli system settings advanced set -o /LSOM/VSANDeviceMonitoring -i 0

  • I also recently learned from reading Cormac's blog that there is also new ESXi Advanced Setting in VSAN 6.2 which allows VSAN to provision a VM swap object as "thin" versus "thick" which has been the historically default. To disable the use of "thick" provisioning, you will need to run the following ESXCLI command on each ESXi host:

esxcli system settings advanced set -o /VSAN/SwapThickProvisionDisabled -i 1

  • Lastly, if you plan to run Nested ESXi VMs on top of your physical VSAN Cluster, be sure to add this configuration change outlined in this article here, else you may see some strangeness when trying to create VMFS volumes.

vsan62-intel-nuc-2

Final Word

I have only had the NUC for a couple of days but so far I have been pretty impressed with the ease of setup and the super tiny form factor. I thought the Mac Mini's were small and portable, but the NUC really blows it out of the water. I was super happy with the decision to go with an all-flash setup, the deployment of the VCSA was super fast as you would expect. If I compare this to my Mac Mini which had spinning rust, for a portion of the VCSA deployment, the fan would go a bit psycho and you can feel the heat if you put your face close to it. I could barely feel any heat from the NUC and it was dead silent which is great as it sits in our living room. Like the Mac Mini, the NUC has regular HDMI port which is great as I can connect it directly to our TV and has plenty of USB ports which could come in handy if you wanted to play with VSAN using USB-based disks 😉

vsan62-intel-nuc-4
One neat idea that Duncan Epping had brought up in a recent chat with him was to run a 2-Node VSAN Cluster and have the VSAN Witness appliance running on a desktop or laptop. This would make for a very simple and affordable VSAN home lab without requiring a 3rd physical ESXi node. I had also thought about doing the same but instead of 2 NUCs, I would be combining my Mac Mini and NUC to form the 2-Node VSAN Cluster and then run the VSAN Witness on my iMac desktop which has 16GB of memory. This is just another slick way you can leverage this new and powerful platform to run a full blow VSAN setup. For those of you following my blog, I am also looking to see if there is a way to add a secondary network adapter to the NUC by the way of a USB 3.0 based ethernet adapter. I have already shown that it is definitely possible with older releases of ESXi and if this works, could make the NUC even more viable.

Lastly, for those looking for a more beefier setup, there are rumors that Intel maybe close to releasing another update to the Intel NUC platform code named "Skull Canyon" which could include a Quad-Core i7 (Broadwell based) along with supporting the new USB-c interface which would be able to run Thunderbolt 3. If true, this could be another option for those looking for a bit more power for their home lab.

A few folks had been asking what I plan to do with my Mac Mini now that I have my NUC. I probably will be selling it, it is still a great platform and has Core i7 which definitely helps with any CPU intensive tasks. It also supports two drives, so it is quite inexpensive to purchase another SSD as it already comes with one to setup an all-flash VSAN 6.2 setup. Below are the the specs and If you interested in the setup, feel free to drop me an email at info.virtuallyghetto [at] gmail [dot] com.

  • Mac Mini 5,3 (Late 2011)
  • Quad-Core i7 (262635QM)
  • 16GB memory
  • 1 x SSD (120GB) Corsair Force GT
  • 1 x MD (750 GB) Seagate Momentus XT
  • 1 x built-in 1Gbe Ethernet port
  • 1 x Thunderbolt port
  • 4 x USB ports
  • 1 x HDMI
  • Original packaging available
  • VSAN capable
  • ESXi will install OOTB w/o any issues

Additional Useful Resources:

  • http://www.virten.net/2016/01/vmware-homeserver-esxi-on-6th-gen-intel-nuc/
  • http://www.ivobeerens.nl/2016/02/24/intel-nuc-6th-generation-as-home-server/
  • http://www.sindalschmidt.me/how-to-run-vmware-esxi-on-intel-nuc-part-1-installation/

Categories // ESXi, Home Lab, Not Supported, VSAN, vSphere 6.0 Tags // ESXi 6.0, homelab, Intel NUC, notsupported, Virtual SAN, VSAN, VSAN 6.2, vSphere 6.0 Update 2

Hidden OVF 2.0 capablity found in the vSphere Content Library

01.12.2016 by William Lam // 5 Comments

There are a number of new and useful capabilities that have been introduced in the OVF 2.0 specification. One such capability which I thought was really interesting and that could easily benefit VMware-based solutions is the ScaleOutSection feature. This feature allows you specify the number of instances of a given Virtual Appliance to instantiate at deployment time by making use of pre-defined OVF Deployment Options which can also be overriden by a user.

Lets use an example to see how this actually works. Say you have a single Virtual Appliance (VA) and the application within the appliance can scale to N, where N is any number greater or equal to 1. If you wanted to deploy 3 instances of this VA, you would have to deploy it 3 separate times by either by running through an OVF upload or deploying it from a template. In either case, you are performing N-instantiations. Would it not be cool if you could still start with a single VA image and specify at deployment time the number of instances you want to deploy and only need to upload the VA just once? Well, that is exactly what the OVF ScaleOutSection feature provides.

Below is a diagram to help illustrate this feature further. We start out with our single VA, which contains several pre-defined Deployment Options which can contain any text you wish for the logical grouping. In this example, I am using the terms "Single", "Minimal" and "Typical" to map to number of VA's to deploy which are 1, 3, and 4 respectively. If we choose the "Minimal" Deployment option, we would then get 3 instantiated VA's. If we decide that the defaults are not sufficient, we could also override the default by specifying a different number which the VA supports.

OVF20_ScaleOut
A really cool use case that I had thought about when I first came across the ScaleOutSection feature was to make use of it with my Nested ESXi Virtual Appliance. This capability would make it even easier to standup a vSphere or VSAN Cluster of any size for development or testing purposes. Today, vSphere and many of the other VMware products only support OVF 1.x specification and as far as I know, OVF 2.0 was not something that was being looked at.

Right before holiday break, I was chatting with one of the Engineers in the Content Library team and one of the topics that I had discussed in passing was OVF 2.0 support. It turns out that, although vSphere itself does not support OVF 2.0, the vSphere Content Library feature actually contains a very basic implementation of OVF 2.0 and though not complete, it does have some support for the ScaleOutSection feature.

This of course got me thinking and with the help of the Engineer, I was able to build a prototype version of my Nested ESXi Virtual Appliance supporting the ScaleOutSection feature. Below is a quick video that demonstrates how this feature would work using a current release of vSphere 6.0. Pretty cool if you ask me!? 🙂

Demo of Prototype Nested ESXi Virtual Appliance using OVF 2.0 ScaleOut from lamw on Vimeo.

Now, before you get too excited. There were a couple of caveats that I found while going through the deployment workflow. During the deployment, the VMDKs were not properly being processed and when you power on the VMs, it was as if they were empty disks. This was a known issue and I have been told this has already been resolved in a future update. The other bigger issue is how OVF properties are handled with multiple instances of the VA. Since this is not a supported workflow, the OVF wizard is only brought up once regardless of the number of instances being deployed. This means that all VAs will inherit the same OVF values since are you are only prompted once. The workaround was to deploy the VAs, then go into each individual VA and update their OVF properties before powering on the VMs. Since OVF 2.0 and the ScaleOutSection feature is not an officially supported feature, the user experience is not as ideal as one would expect.

I personally think there are some pretty interesting use cases that could be enabled by OVF 2.0 and ScaleOutSection feature. A few VMware specific solutions that I can think of off the top of my head that could potentially leverage this capability are vRealize Log Insight, vRealize Operations Manager and vRealize Automation Center to just name a few. I am sure there are others including 3rd party and custom Virtual Appliances that have been developed and I am curious to hear if this is something that might be of interest to you? If you have any feedback, feel free to leave a comment and I can share this with the Content Library PM.

Categories // ESXi, Nested Virtualization, OVFTool, vSphere Tags // content library, ova, ovf, ovf 2.0, ScaleOutSection, virtual appliance

  • « Previous Page
  • 1
  • …
  • 50
  • 51
  • 52
  • 53
  • 54
  • …
  • 68
  • Next Page »

Search

Thank Author

Author

William is Distinguished Platform Engineering Architect in the VMware Cloud Foundation (VCF) Division at Broadcom. His primary focus is helping customers and partners build, run and operate a modern Private Cloud using the VMware Cloud Foundation (VCF) platform.

Connect

  • Bluesky
  • Email
  • GitHub
  • LinkedIn
  • Mastodon
  • Reddit
  • RSS
  • Twitter
  • Vimeo

Recent

  • Ultimate Lab Resource for VCF 9.0 06/25/2025
  • VMware Cloud Foundation (VCF) on ASUS NUC 15 Pro (Cyber Canyon) 06/25/2025
  • VMware Cloud Foundation (VCF) on Minisforum MS-A2 06/25/2025
  • VCF 9.0 Offline Depot using Synology 06/25/2025
  • Deploying VCF 9.0 on a single ESXi host? 06/24/2025

Advertisment

Privacy & Cookies: This site uses cookies. By continuing to use this website, you agree to their use.
To find out more, including how to control cookies, see here: Cookie Policy

Copyright WilliamLam.com © 2025


Loading Comments...